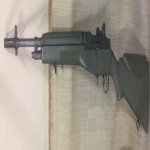
So I'm in the camp that the israeli DMR stocks look terrible, are awful in every way, and have an enormous cheek piece that puts your head way too high for any of the good mounts form ARMS, SEI or Sadlak.
Normally I would throw this POS in the garbage, but now it's really tough to find USGI fibreglass in Canada and Treeline has ceased selling their stocks to Canadian
So I'm going to try and repair my ratty isreali stock, even though it's been bubbaed by the IDF, repaired in the past, and generally looks like it was drug around the middle east out the back of a tank on a length of chain.
Sthe cheek piece comes off with 2 screws. Below that, there are a couple 1.5" long steel busings threaded into the stock and epoxied in place. I turned the screw slots to mush on those bushings and eventually had to use a large EZ-out to break the epoxy seal and back them out of the stock. I also had to cut off the recoil pad to get access to the screws. It had hardened into crumbly rubber the consistency of rigid plastic. Below that is a re-worked aluminum inner USGI buttplate that has been sol altered, it just belongs in the trash can.
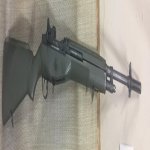
The side swivel in the forestock has to be ground out from inside the barrel channel. It was hydraulically pressed together at the IDF rebuild facility, so you have to destroy it to get it off. I may keep the bipod stud, it's well done and potentially useful.
Once you get it stripped all down, there is some repair work required...
Here's the comb of the stock with the bushings removed. The israelis drilled all the way down into the cleaning kit compartment, even though most of that is just foam stock filled. I found a pipe of close diameter to the cleaning kit compartment and wrapped some paper around it until it was a tight fit in the cleaning kit hole.

Next you fill the holes with spray foam, the kind from the hardware store for installing window frames is idea. It has to cure 8 hours, after which we will cut it back to the depth of the original foam and fill the top of the holes with epoxy or JB Weld.

Next I took the backing plate from the side swivel and used one side of it as a smooth backing. I used pieces of wood to jig it into place and filled the hole with JB weld. After 8 hours, we'll dress that off.

The Israelis actually milled off the sides of the stock that normally cover the sides of the buttplate. These will need to be built back up with JB Weld, but it would be too flimsy if not reinforced. I drilled some holes and bent some nail shafts which I epoxied in place to give the new "wings" a little rigidity.

While all this stuff is drying, I need to build a spacer where the buttplate usually goes. I'll later need to dam around the comb as well so I can pack JB Weld into the voids and re-construct the stock wings.

Everything has to dry overnight and I'll do some more work on it. More to follow.
Normally I would throw this POS in the garbage, but now it's really tough to find USGI fibreglass in Canada and Treeline has ceased selling their stocks to Canadian
So I'm going to try and repair my ratty isreali stock, even though it's been bubbaed by the IDF, repaired in the past, and generally looks like it was drug around the middle east out the back of a tank on a length of chain.
Sthe cheek piece comes off with 2 screws. Below that, there are a couple 1.5" long steel busings threaded into the stock and epoxied in place. I turned the screw slots to mush on those bushings and eventually had to use a large EZ-out to break the epoxy seal and back them out of the stock. I also had to cut off the recoil pad to get access to the screws. It had hardened into crumbly rubber the consistency of rigid plastic. Below that is a re-worked aluminum inner USGI buttplate that has been sol altered, it just belongs in the trash can.
The side swivel in the forestock has to be ground out from inside the barrel channel. It was hydraulically pressed together at the IDF rebuild facility, so you have to destroy it to get it off. I may keep the bipod stud, it's well done and potentially useful.
Once you get it stripped all down, there is some repair work required...
Here's the comb of the stock with the bushings removed. The israelis drilled all the way down into the cleaning kit compartment, even though most of that is just foam stock filled. I found a pipe of close diameter to the cleaning kit compartment and wrapped some paper around it until it was a tight fit in the cleaning kit hole.
Next you fill the holes with spray foam, the kind from the hardware store for installing window frames is idea. It has to cure 8 hours, after which we will cut it back to the depth of the original foam and fill the top of the holes with epoxy or JB Weld.
Next I took the backing plate from the side swivel and used one side of it as a smooth backing. I used pieces of wood to jig it into place and filled the hole with JB weld. After 8 hours, we'll dress that off.
The Israelis actually milled off the sides of the stock that normally cover the sides of the buttplate. These will need to be built back up with JB Weld, but it would be too flimsy if not reinforced. I drilled some holes and bent some nail shafts which I epoxied in place to give the new "wings" a little rigidity.
While all this stuff is drying, I need to build a spacer where the buttplate usually goes. I'll later need to dam around the comb as well so I can pack JB Weld into the voids and re-construct the stock wings.
Everything has to dry overnight and I'll do some more work on it. More to follow.