Scope Mount on a Sporterized No 4?

Fox

CGN Ultra frequent flyer
Rating - 100%
48   0   0
Location
Kemptville
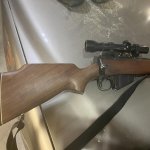
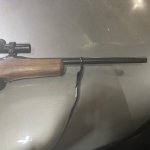
I was given a No 4 Longbranch with mint rifling, the problem is that the rear sight that was put on the gun was done wrong and the thing shoots 6in left at 50 yards. To align the rear sight the thing has to be knocked almost out of the dovetail, which looks stupid and honestly is going to risk losing the sight.

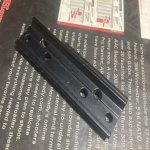
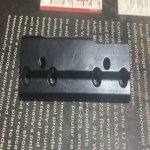
Due to this I was wondering, with the rear top of the receiver trimmed and no original No 4 aperture sight mount remaining what would you guys do for a scope mount or an adjustable aperture sight?

Could you put a nice Williams or Lyman peep on it or a scope mount on the side for a minimal charge or will I need to have the open sights redone?

Thanks
 
What I have done - not sure if you will find parts any more - there was a side mount for #4 made by Parker Hale - required 3(?) or 4(?) holes drilled into left side of receiver rail and then threaded. Was also a system that required two drilled and tapped holes into front receiver ring (on top) and then a replacement piece that replaced the rear sight - used same axle and spring loaded "push up". Unfortunately, either system required Parker Hale rings, which some find difficult to find these days. The replacement part for the rear sight was A21 base - it had an integral aperture sight - none adjustable - with that aperture you needed the High RAHS rings. If you sawed or filed that aperture sight off, you could use the Low RALS rings.

There might be a Weaver side-mount system available - I do not recall if made only for curve sided No. 1, or also for flat sided No. 4. In any of those systems, you will have to drill and tap some holes - that may be problematic for some - No. 4 was never made for a scope - is all added on later. And then, was common enough to add a wooden check riser to the comb of the butt stock - sight line for scope going to be higher than sight line of iron sights - so most people want raised "cheek rest" for scope use on a No. 4.

I think there used to be a Weaver TO-1 base - also required two holes drilled and tapped into front receiver ring - was a longish one piece base that required more hole (s) drilled and tapped into that cross bar behind the magazine opening. The one used the 3/8" clamps rings often found on rimfire rifles - 3/8" clamps, but for 1" diameter scope body.

Ya, I think it would require a cheek riser for sure, unless there was an aperture added to the back, a side mount aperture?
 
Weaver TO-1 mount requires 3 holes to be drilled and tapped. The PH set-up that Potashminer refers to only requires the front base to be drilled, the rear was as described. The side mount that he is referring to can be modified to use a top mount Weaver one-piece base if you align a few mounting holes and drill and tap to 6-48. However, these side-mounts weren't very meaty.
I've done many TO-1's and concur that a higher comb is needed.
 
Is there a flat side mount peep that would work or is the safety and whatnot too much in the way on these guns?
 
Mount you want is a Weaver 3A. Back is flat sided except for the top which has a ridge. A cut out has to be made in that ridge to clear the charger bridge. Receiver has to be tapped and drilled. I bought one to put on one of mine but changed my mind and went with the S/K no tap and drill.
 
There was a Redfield aperture sight - marked OM 80, I think - that attached to an adapter plate. That adapter plate attached to a No. 4 receiver on the left rear - around that safety lever. I think the adapter plate used the ejector screw and possibly the rear sight axle pivot hole to attach? Was two sets of drilled / tapped holes in that adaptor plate - either for differing heights or differing aperture sights? I no longer have it in hand - was sold to a CGN guy circa Oct 2018.

E2EDA5D8-9D27-4828-B2C2-A68B25F96EBD.jpg

Should be a picture of a "truck gun" that I made - that was a Bishop brand butt stock with Monte Carlo, then a Parker Hale A20 front base and an A21 rear base. The aperture has been removed from that A21 base, so I was able to use Parker Hale RALS.3 Low rings. That is a Weaver K3-1 scope installed - with the tapered post with horizontal wire reticle. That is the original Maltby forearm that has been shortened - the barrel is cut back and re-crowned circa 20" long.

31FE2CC3-F28C-4AAB-9F08-AB8266C8077A.jpg

Second picture to show the shortened forearm and shortened barrel - that front sling swivel is a two piece "clamp", I think - might have been meant for a 28 gauge shotgun barrel, originally. I did not want a sling attachment on that forearm - only that "king screw" holds the forearm in place (with the "draws").
 

Attachments

  • E2EDA5D8-9D27-4828-B2C2-A68B25F96EBD.jpg
    E2EDA5D8-9D27-4828-B2C2-A68B25F96EBD.jpg
    63.7 KB · Views: 196
  • 31FE2CC3-F28C-4AAB-9F08-AB8266C8077A.jpg
    31FE2CC3-F28C-4AAB-9F08-AB8266C8077A.jpg
    44.4 KB · Views: 193
Last edited:
... with the rear top of the receiver trimmed and no original No 4 aperture sight mount remaining what would you guys do for a scope mount or an adjustable aperture sight?
...

Is also a possibility to go all "wild and crazy". If you can drill and tap, might be able to fabricate something that works?

I started to hunt deer with a No. 4 - my hands at the time too small or too weak to operate that left side safety lever - so I did not use it - a No. 4 is "controlled round feed" - either the magazine has the shell, or the bolt does - is about no time when the shell is not held by one or the other. So I would chamber a round and the bolt was held in position by the rounds in the magazine, pushing "up" on the bolt. So, I did not use the safety at all - bolt handle either up (open), or slapped down to fire - at the time, was about as easy to close the bolt, as it was to flip it over and operate that safety lever. Since then, I have read of certain battle rifles - the French MAS, I think - that were made without a safety of any sort. I've never tried it yet - but I suspect that you could discard the entire No. 4 safety mechanism to gain some real estate to fit a side-mounted aperture sight - just would lose the bolt locked-shut function as well - which, in my case, was not an issue, anyways.

As per some older Parker Hale catalogues here - it appears that peeling off the original aperture sight ears, and the "charger bridge", was a thing that was done commercially to sell those rifles as "sporters".
 
Addley Precision makes a no drill mount for a No 4 with Picatinny rail. Made in Canada, google is your friend.

This thing has had the rear sight assembly machined off, the Addley Precision mounts that are no drill are for ones that have not been modified. They do have a drill and tap version that I did find via google but I also reached out here because here people have real world experience.

Thanks
 
It is possible to make a side mount using a piece of angle iron. A good gunsmithing project. Lay out and drill three holes in the angle. Drill and tap three matching holes in the left sidewall. It is important that the top of the angle iron is parallel with the bore. A hole at one end can be drilled and tapped first, and the mount installed using the one screw. It can then be rocked to determine where the other two holes should go. Top of angle should be parallel to the bottom flat of the receiver. Layout and drill holes in the top of the angle iron for a Weaver flat bottomed one piece base. The holes must be parallel with the side of the angle. Neatly made and finished, the appearance is quite satisfactory.
Or, just buy a Weaver sidemount base and rings. See Snider shooter's post above.
 
I’m running an Addley no smith No.4 mount but as you already know you need the rear sight mounting points for it to bolt down, it’s a really solid mount. Iirc the drill and tap Enfield mount they make is for the No.1, I might bearing but I don’t think I’ve seen a d&t mount for the No.4 from Addley.
 
You very might well be able to drill a couple extra holes through the mount and sidewall of the Addley mount to secure it to the receiver, it sits right up against the sidewall from what I remember, pics seem to back this up. I can dig it out and post better pics if you need it.

UyJDTGM.jpg
 
It is possible to make a side mount using a piece of angle iron. A good gunsmithing project. Lay out and drill three holes in the angle. Drill and tap three matching holes in the left sidewall. It is important that the top of the angle iron is parallel with the bore. A hole at one end can be drilled and tapped first, and the mount installed using the one screw. It can then be rocked to determine where the other two holes should go. Top of angle should be parallel to the bottom flat of the receiver. Layout and drill holes in the top of the angle iron for a Weaver flat bottomed one piece base. The holes must be parallel with the side of the angle. Neatly made and finished, the appearance is quite satisfactory.
Or, just buy a Weaver sidemount base and rings. See Snider shooter's post above.
I had a No.4 similar to yours. No sight bridge and the damned plastic blade on the foresight had broken. I removed the ramp and fabricated a scope mount out of a piece of angle iron, as you propose. I bought a flat bottom scope rail, the one made for the flat top Marlin lever action receivers, and drilled and tapped 'er onto the angle iron. I did the cut-out for the ejector screw head and tapped and drilled it into the side of the receiver. Here's the finished result. Works OK for me.
 
When I was circa 15 or 16, I used hacksaw and hand files to make a mount for a No. 4 as has been described - I think it was 1 1/2" x 1 1/2" x 0.100" thick angle iron. On the top, I filed it close to size of a Weaver base - complete with 90 degree sides and cross slots. Some no-name brand rings and a cheapie 4X scope and it worked - my brother has it in a scabbard on his snow mobile now - so it has lasted more than 50 years. Won't win any "looks" prizes, that is for sure!! But was never the thinking, then, about hunting rifles made from Lee Enfield No. 1 or No. 4 - they were "uber" cheap to acquire, back then.

I do remember scribing "centre" lines with pointy end of a geometry set compass. Did not own or have access to callipers then, so likely any measuring was done with eyeball and ruler. I do not remember what size screws that I used to attach that base to the side-wall of that receiver - would be #8-40 tpi pretty typical today on store bought stuff. Europeans had their own sizes - likely based on 3 mm or so?
 
Last edited:
Back
Top Bottom