











































Shotgun shell reloading

little b

Member
Rating - 100%
27   0   0
Location
Calgary
Hey all I know this will be a question for so few that there maybe no one who can answer but oh well.
I have been using a Ponsness Warren Duo Matic 375 that I picked up used like 15 years ago now. I'm getting back into clay shooting this year after not going near it for almost 4 years but the thing that I noticed this year now that I picked up a 8 point crimp starter to use on the Federal HOA hulls I'm reloading was that I have been using an overshot card to ensure the crimp kept all the 7.5 lead in. As the crimp typically has had an bit of an off center swirl to the crimp or a hole about the size of a #8 in the middle. Slowing down and hand lining up the crimp starter to be in the folds of a crimp has helped but just reduced the issue but no removed it.
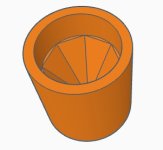
And it's not that the crimp starter is a 20g and not a 12g to match what I'm shooting, it's the right size and the crimp starter is a little larger than the diameter of the hull, but on a whim I have 3D printed a pre crimp that pushes the the edges of hull in apx 15 deg before doing the crimp started.
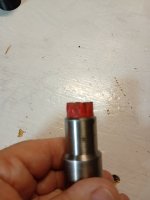
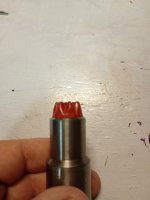
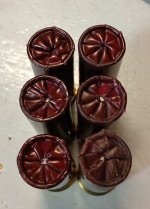
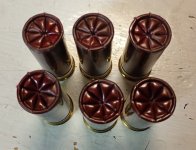
The result hopefully you can make out in the picture is that while I no longer need the overshot card you can see the center of the crimp is just slightly down in the middle.
So any ideas or help as to what I may need to adjust to be able to remove the pre crimp step while a step up from the overshot card as it's fast to do I would still like to remove the step all together if I can.
Thanks for the thoughts
 

Attachments

  • shell comp.jpg
    shell comp.jpg
    99.2 KB · Views: 30
Usually when crimps are dished in it is because of a stack height that is a bit too low
Hulls sometimes have non consistent lengths too so some will have swirls and others a hole
I used to trim my hulls the same length to get pretty crimps but I am not doing that anymore
If everything fits and nothing leaks out it’s good enough for me
With no bulky flake powders available and only fine dense ones like tightgroup you have to go to a different sized wad to get the right stack height
As an example with an sts hull using tightgroup I have to use the 7/8 oz clay buster wad for a one oz load as opposed to the usual one oz wad otherwise the stack height is too low and you get dished crimps and holes
This is because the dense powders take up less space in the hull so you need to compensate by using a taller wad
I’ve discovered that a lot of recipes in the load manuals just do not fit well so I try a bunch of different ones until I find one that works good and get a good crimp with
 
Thanks Deathrawt, your right that the dish in is due to stack height and yup don't really care as they work just fine like that.
And yes I agree with you the manual loads are very hit and miss for fit and playing is needed. Thus using an overshot card is very useful to take up a little space at the top to improve what the crimp is at the end.
I guess my question really was is there something I need to be doing/fixing as without using the added pre crimp step I have to use an overshot card to get something that stays together, the swirl from the crimp being a little off center doesn't bother me, I should find a couple of the uglier ones when it folded a petal over the rest due to it being off. But adding the pre crimp step I no longer need the overshot card and now the crimps are other than a little bit of dishing in due to hull being a little long for the load are almost perfect.
I was trying to ask more about what I'm messing up that I needed to add a pre crimp step to the process as clearly with no change to press or hardware the equipment is capable of producing very contestant and clean crimps.
The difference is minor of adding the pre crimp step but makes a improves to outcome and speed.
 

Attachments

  • Hull no pre crimp.jpg
    Hull no pre crimp.jpg
    57.8 KB · Views: 8
  • hull with pre crimp.jpg
    hull with pre crimp.jpg
    65.3 KB · Views: 8
  • pre crimp.jpg
    pre crimp.jpg
    13.5 KB · Views: 8
Can you adjust the depth you set the wad ?

I used to load a lot of WinAA hulls on a Hornady 366. Pretty sure there was an adjustment.

Anyway whenever I had the odd one that leaked shot - I loaded #8- I gathered up those and dropped a dab of wax from a candle on the top. Problem solved
 
Yup you can adjust the wad seating depth and had played with that in the past. Using both the pre crimp tool and adding a thin overshot card make a perfect looking crimp. But I'm not trying to get perfect but speed up what I do as the overshot card can be fiddly and time consuming when it doesn't want to play nice. The equipment is clearly capable and adding a pre crimp greatly improves how well the hull centers on the pre crimp and improves the output.
Maybe I'm just being delusional about expectation from this model as looking at the parts list on the current web site has a taper crimp kit but I'm not spending $174 USD when a 20 cent 3d printed part is doing the job, I'll live with the time it takes to add the pre crimp step as then I'm not spending money on overshot cards I don't need.
I guess as this year I'm really trying to get more detailed with what I'm doing on the rifle side of things it has spilled over to what I'm doing shotgun wise and noticed what while is easy to accommodate as I have been doing in the past as it all shots just fine but figuring out that the reason for the crimp not being as good as I know the machine is capable of but looks like I just need to nudge it to improve my results to me is then there is something that I should be able to fix with my process .
Maybe it's just the fact that the difference between hull design between when this press came out I have no idea how many years ago, as I got it used 15 years ago and the guy I got it from it was a hand me down for him is the difference that I made it necessary to add a pre crimp to still get the results the machine is capable of.
As I said off the top I understand how much smaller the shotgun reloading community is vs the rifle reloading and like so many I reload not to save money but to be able to shot more and know how good what I shoot is.
If anyone wants the file for the pre crimp or want's one to see if you have improvements just ask. Otherwise I'm sure I'll post the file to printables sooner or later it just seems such a small thing.
 
First off, can you post the complete load recipe you're using?

I'm not 100% sure I'm following what you're doing with the 3D printed pre crimp you made. Is that installed on the machine (in the 2nd last pre- crimp stage) or are you manually (with your hand) pressing down on your hull mouth with it to start your crimp before the pre crimp die?

Have you adjusted your actual pre crimp die? Lowering it should help close up the holes in your crimp. Your picture labeled 'hull with pre crimp' does not look like you have your pre crimp die low enough. Hull mouth should be more closed than that prior to the final crimp stage.

Again, please post the complete recipe you're using. And pictures of the shell from above at these 3 stages will also help with diagnosis
1. After shot dropped, with hull mouth still wide open, before the pre crimp stage
2. After the pre-crimp /crimp starter stage
3. After final crimp
 
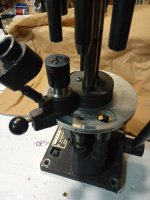
Does your 375 have the metal crimp starter, or the plastic one?

I picked up a PW 375 last year just cuz it was going at the local auction for way, way less than I know they cost. I used to load a lot of 12 gauge on a MEC 600 and a Hornady DL-155, this was my first experience with a PW machine.

Now, I have only loaded a couple hundred rounds on it, but in that I have not been able to get the crimps where I think they should be. The MEC is pretty good for adjustability, and the Hornady is awesome in its ability to be adjusted to a tight crimp for almost any load. But with this PW system I just don't see that I have much options for adjustment. The fact that the shell rides in the sizing die seems to preclude setting a deep enough crimp start for the finishing die to work with. I know the taper crimp models have a slightly shorter sizing die, so that might make a big improvement.

Now that I say that, I wonder how this 3D printed gizmo of yours work? How can it push the sides of the hull in, when those are guarded by the sizing die?
 
So load is hull Federal HOA, powder is Longshot bushing G (don't remember the actual grain that is) wad is Claybuster Lighting CB4100-12B and 7/8 of 7.5 lead shot with federal 209 primers and does 1250 FPS been using Athlon rangecraft for velocity as 3D printed an adapter for it (https://www.printables.com/model/1786827-athlon-rangecraft-arca-picatinny-rail-adapter) and a picatinny rail clamp for the barrel and it's been great for getting speeds.

XLNC
I have adjusted the crimp die down and have actually 3d printed a bushing so when I swap between 6 and 8 point crimps for the two different hulls for 2 different loads I use it always ends up as low as I want it. Any lower does not improve things at this point. the most notable thing about adding this pre pre crimp tool is that without it it is normal to have a swirl or the center of the crimp to be off center and occasionally get a petal folded over, using the pre crimp tool I find I spend less time to put it on, raise the hull, bring it down and remove it then the time I was spending trying to get the taper crimp to make sure the wires seated into a fold of the existing crimp. Now the tamper crimp takes the hull to a point just like it should every time.

When I caught 1 time that the tamper crimp came down so poorly on a hull that it pushed part of it out I started manually pushing the hull together as it was like the tamper crimp tool was to small which is what led to the tool, I think the version I am using is the 4th variation of it and has been working great

The pre crimp tool is manually being placed on and off the hull.

BattleRife you may be right on the money with the fact that this old version of the press is lacking some of the adjustments of the newer, looking at the name plate on it the fact that it says patent pending increases my expectations this may be just that old which is fine as it works great, and it is a metal 8 point crimp

The extra step comes in on the powder station 3 and goes as follows
rase hull drop powder
drop to insert wad
raise to seat wad and then drop shot
all that's the normal while on the same station lower and place pre crimp on hull raise the hull using the drop tube to push it down giving the initial cone shape to the hull
then remove the pre crimp tool cycle over to taper crimp
then over to finial station to finish crimp
as always this load is for educational purposes only please note that when I worked up this load in a different hull and then moved it over to the HOA it picked up another 200 FPS with the hull change

And pulled a couple more of the ugly crimps that after tomorrow will not exist but will break targets just fine
 

Attachments

  • pre crimp.jpg
    pre crimp.jpg
    90.1 KB · Views: 9
  • ugly crimps.jpg
    ugly crimps.jpg
    83.6 KB · Views: 9
Pinch off a piece of cotton ball and stuff in in on to of the lead before you crimp. I've used the paper dots from out of a hole puncher as well.
 
Your pre crimp needs to bring the hull mouth together enough that you couldnt fit the eraser end of a pencil through it. If its open any more than that, your precrimp die needs to be lowered more. That should remove any holes in your final crimp.

But I really suggest you go to a completely different recipe for a 7/8oz 12ga load though. You're spending a lot of time and extra money on an issue you could avoid using an appropriate height wad to not need an overshot card, and using a different powder. Longshot is really unsuitable for 7/8oz 12ga. You could save almost 50% of your powder cost going to a more appropriate powder like Perfect Pattern, which would need <15 grains for 7/8 oz, compared to what I assume is close to 30 grains of Longshot you're using from a PW G bushing.
 
This is the right answer.
No not really, I'm not concerned about a perfect crimp I thought I was clear about that and perfect powder I've see only one place had it in stock not long enough that I was not able to order it, but in the mean time I have plenty of Longshot that while may not be the a fantastic powder in the application is not costing me anything to use vs buying more. When I'm out then that will happen

And looking at the some of the stuff for the MEC by all accounts my press is lacking in the ease of some of the adjustment but the major issue that this conversation lead me to finding out is that there is a new style of pre crimp die for the press that captures the outside of the hull same as my 20 min 3D printed part does before applying the pre crimp. But $174 USD I don't need to spend as I have a fix that as it stands just takes an extra 3-4 seconds
 
Back
Top Bottom