












































NorthCoastBigBore
CGN frequent flyer
- Location
- Northwest BC (Rural) 103-I-##
For anyone interested, I've been playing around with a dead simple rust browning formula you can make with true household ingredients, readily available no matter where in the country you are. I'm putting this in this section instead of "Gunsmithing" because it has to do with muzzleloader builds - but mods can of course move it if you disagree 
I've used B/C Plum Brown in the past (and just got some more from Amazon.ca of all places) and really like the finish BUT wanted a real rust brown on a project. Track of the Wolf can't ship Laurel Mountain Forge across the border any longer, and everything was looking fairly pricey anyway these days with the Canadian Peso sitting where it is. There are lots of recipes out there but most call for some industrial type acids, etc. - I have enough hazardous materials to dispose of as it is, I don't need any more in the shop. So I fired up the "Google" a few months back and after trying out a few I found, this one here seems to work - and work well:
1/2 TBSP salt
2 TBSP Vinegar
8 TBP Hydrogen Peroxide (I'm just using the 3% mixture stuff from the Wal-Mart)
Mix 'em all together in a GLASS jar. Note that the first jar I mixed several months ago, has rusted through it's lid! I zapped it all in the microwave on the first mix, for 30 seconds or so, to dissolve the salt. Keep a nuke-safe lid on the jar to limit evaporation.
For the parts I've done so far, I found a 400 grit polish is too smooth for the solution to act on effectively right away, so I scuffed things up with 320 and that seems to work.
Degrease everything well; I used both brake-clean and acetone, honestly both worked the same. Acetone gets the nod just because it's cheaper. I didn't get carried away with gloves (safety precautions dictate you should though) I just avoided touching the surfaces.
I tried both dipping the parts and just wiping the solution on; and generally both worked. You will get blotchy results the first few passes and eventually it evens out. If there are stubborn parts (I have some parts, like a hammer, with some casting inclusions within the overall piece that seem to have a different composition to them), try rubbing the solution on, then coating it. Eventually it will take and once it starts to rust, it should keep rusting. The following are pictures of the lock plate in various stages. Update - see the bottom for note on heating the part first; this step seems to speed everything up and allows for a polished surface to take the solution
I am not a photographer. The dots are just a centerpunched design and my own sorry attempt at "engraving" (forgive me!):
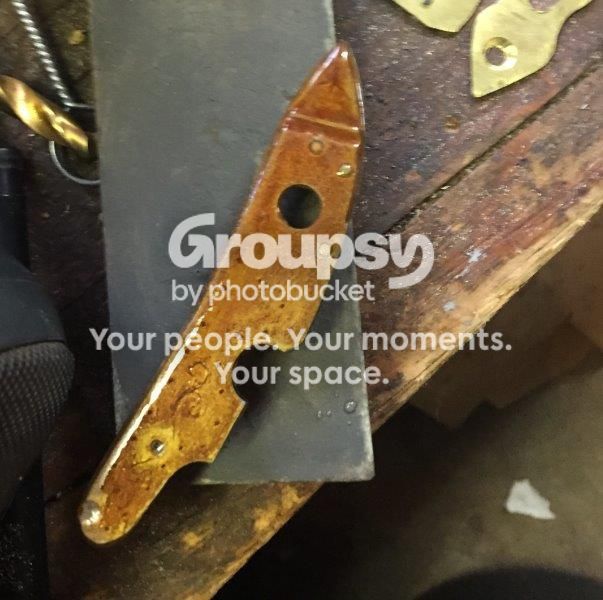
This ^^ is after the second or third coat, with a generous new application of the solution on it. One mistake I made was not "carding" it enough during these first few crucial coats, so I ended up with a more matte finish than I was shooting for; I'm still happy with it though.
I just used denim pieces taken from old jeans to do the carding. I know you can buy carding wheels, or use fine steel wool. For me, I'm using old pieces of denim. "Others are welcome to do as they wish."
Card and then degrease between coats. Take care with the first couple of coats to make sure you don't cause pits in the steel.
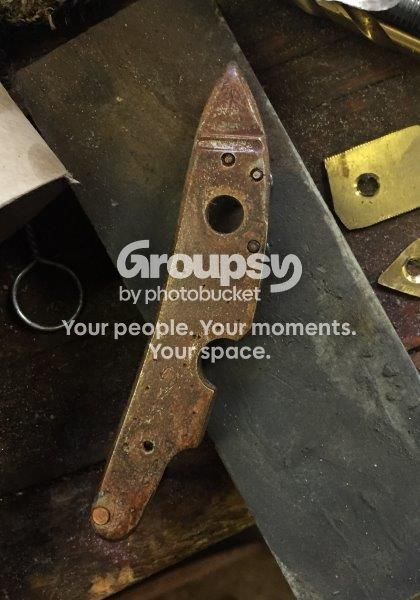
Getting there
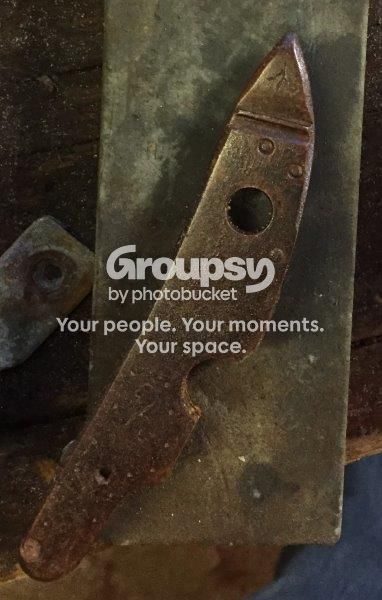
Last coat, it is as dark as I want. I think this was several days later (leaving the solution on over night and then during the days while I was at work). I haven't polished it yet in this picture, but it does turn out like I want.
Once you have the colour you are looking for, rinse the part off with HOT water; dry it well; then oil it with an oil that does not have rust inhibitors in it. I am just using cheap 5w30 that doesn't list anything special in it. Seems to work. You may have to wash it in a baking powder solution but this seems to arrest the rusting; however it may still continue to absorb oil, just keep oiling until it stabilizes.
I found everything browned up nicely without a sweat box, but for interest sake I ended up making a quick "sweat box" using a Rubbermaid bin, an old glass jar and a trouble light (well in this case just an old lamp base). The only reason the bin is cut is because I used the base for an unrelated chicken coop project. Took 2 minutes to throw together, and it works really well - speeds up the process.
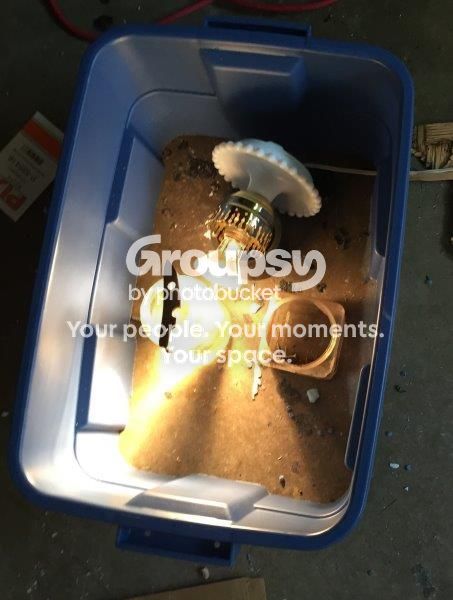
I also discovered that the steam from the jar was enough to turn rusted pieces a deep, dark blue - especially if I poured boiling water in the jar. So use cool water in the jar. Browning of course is the first step towards rust bluing - but all I want for this project is brown.
One more caution: practice on some scrap steel similar (if possible) to what you want to use first; it is possible to cause pits, mainly during the first few coats, if left on too long. Once the process is started this seems to be of less to no concern.
Another update: Heating the part before applying, same as with Plum Brown, then coating by wiping the solution on until it cools, works GREAT and allows you to have a more polished surface.
There you have it; hope someone finds it of interest.
NCBB
I've used B/C Plum Brown in the past (and just got some more from Amazon.ca of all places) and really like the finish BUT wanted a real rust brown on a project. Track of the Wolf can't ship Laurel Mountain Forge across the border any longer, and everything was looking fairly pricey anyway these days with the Canadian Peso sitting where it is. There are lots of recipes out there but most call for some industrial type acids, etc. - I have enough hazardous materials to dispose of as it is, I don't need any more in the shop. So I fired up the "Google" a few months back and after trying out a few I found, this one here seems to work - and work well:
1/2 TBSP salt
2 TBSP Vinegar
8 TBP Hydrogen Peroxide (I'm just using the 3% mixture stuff from the Wal-Mart)
Mix 'em all together in a GLASS jar. Note that the first jar I mixed several months ago, has rusted through it's lid! I zapped it all in the microwave on the first mix, for 30 seconds or so, to dissolve the salt. Keep a nuke-safe lid on the jar to limit evaporation.
For the parts I've done so far, I found a 400 grit polish is too smooth for the solution to act on effectively right away, so I scuffed things up with 320 and that seems to work.
Degrease everything well; I used both brake-clean and acetone, honestly both worked the same. Acetone gets the nod just because it's cheaper. I didn't get carried away with gloves (safety precautions dictate you should though) I just avoided touching the surfaces.
I tried both dipping the parts and just wiping the solution on; and generally both worked. You will get blotchy results the first few passes and eventually it evens out. If there are stubborn parts (I have some parts, like a hammer, with some casting inclusions within the overall piece that seem to have a different composition to them), try rubbing the solution on, then coating it. Eventually it will take and once it starts to rust, it should keep rusting. The following are pictures of the lock plate in various stages. Update - see the bottom for note on heating the part first; this step seems to speed everything up and allows for a polished surface to take the solution
I am not a photographer. The dots are just a centerpunched design and my own sorry attempt at "engraving" (forgive me!):

This ^^ is after the second or third coat, with a generous new application of the solution on it. One mistake I made was not "carding" it enough during these first few crucial coats, so I ended up with a more matte finish than I was shooting for; I'm still happy with it though.
I just used denim pieces taken from old jeans to do the carding. I know you can buy carding wheels, or use fine steel wool. For me, I'm using old pieces of denim. "Others are welcome to do as they wish."
Card and then degrease between coats. Take care with the first couple of coats to make sure you don't cause pits in the steel.

Getting there

Last coat, it is as dark as I want. I think this was several days later (leaving the solution on over night and then during the days while I was at work). I haven't polished it yet in this picture, but it does turn out like I want.
Once you have the colour you are looking for, rinse the part off with HOT water; dry it well; then oil it with an oil that does not have rust inhibitors in it. I am just using cheap 5w30 that doesn't list anything special in it. Seems to work. You may have to wash it in a baking powder solution but this seems to arrest the rusting; however it may still continue to absorb oil, just keep oiling until it stabilizes.
I found everything browned up nicely without a sweat box, but for interest sake I ended up making a quick "sweat box" using a Rubbermaid bin, an old glass jar and a trouble light (well in this case just an old lamp base). The only reason the bin is cut is because I used the base for an unrelated chicken coop project. Took 2 minutes to throw together, and it works really well - speeds up the process.

I also discovered that the steam from the jar was enough to turn rusted pieces a deep, dark blue - especially if I poured boiling water in the jar. So use cool water in the jar. Browning of course is the first step towards rust bluing - but all I want for this project is brown.
One more caution: practice on some scrap steel similar (if possible) to what you want to use first; it is possible to cause pits, mainly during the first few coats, if left on too long. Once the process is started this seems to be of less to no concern.
Another update: Heating the part before applying, same as with Plum Brown, then coating by wiping the solution on until it cools, works GREAT and allows you to have a more polished surface.
There you have it; hope someone finds it of interest.
NCBB
Last edited:
























