Some Lee Enfield gunroom artifacts...

Hi Claven2. With the Maxim Gun and the Vickers to use a bore reflector is really a 2 person job. After the top cover is flipped back one has to hold back the crank handle to hold the breach mechanism from slamming forward with whatever force has been applied to the fusee spring. There is no hold open device. On the Lewis gun the breach bolt can be held back by simply pushing in the cocking handle all the way into a slot n the body. Its a good lock only IF the handle is pushed in all the way. The Lewis bolt slams forward from the force put on by the clock spring. So if if its not all the way in the bolt can work its way out of the slot and slam forward.
So I ask you - - wouldn't you tend to only use a bore reflector with a handle to prevent finger injury?
I have never seen a bore reflector for the .22 rifle either.
I turned over all my heavy stuff to a museum years ago. I miss my Lewis. Anybody have one not needed? John T.
It may well be that the handle was originally adopted to make the MG job easier, but the LOCs say the handled pattern became the universal pattern, after which it would have been the model predominantly manufactured.

I will say the handle makes it very easy to insert and retrieve from even a bolt action rifle.
 
Gentlemen! Start your bookcases.

My preferred references for Lee Enfields are Charles "Chip" Stratton's 'For Collectors Only' series, Vol 2 Lee Enfield No.4 and No.5 Rifles, and the often overlooked Major EGB Reynolds' 1960 "The Lee Enfield Rifle". Skennerton is a great coffee table book, but IMHO, his scholarship is lacking especially for Canadian production. For No.4(T) rifles I go to Peter Laidler's books. He has his prejudices and writes with an authoritative tone that is not necessarily always the complete story. Clive Law's 'Without Warning' is brief but valued.

In the words of someone more profound than me, the man who has never read one book is uninformed, but the man who has read one book is misinformed.
 
Nice! Guess I will need to keep searching for one!
Took me 20 odd years to find my first one but within 2 weeks of that I found the 2nd! the 3rd followed a couple of years later, they seem to be quite rare & you really have to keep your eyes open because they are easy to miss especially mixed in with others
 
Hi John, “pics or it never happened” is ultra common forum language across a variety of platforms and it’s usually seen as a fun and good natured way of asking for photos. It’s not intended as a slight or offence. I apologize if you took it as such.
100% with Claven, a very common light hearted comment, used it & had it used on me
 
I have (and use) one of those funnels whenever I shoot corrosive ammo or black powder. I've wrapped the chamber end in electrical tape so it won't scratch a chamber - useful item for sure!

Here's a selection of the most commonly encountered types of charger clips:

ccbtEMX.jpeg

XZsndSz.jpeg


From left to right: MkII, MkIII and MkIV. I've never seen a MkI charger, and google didn't turn one up either. If they were ever made in quantity, maybe someone has one to share but I've not come across any after about 30 years looking for one.

Here's some interesting MOD documentation on the progression of the clips:

Qa9nlJT.jpeg

GUzKpVX.jpeg


The first charger being referred to is clearly the MkIII, which apparently was difficult to use. You can see it was ultimately replaced in October 1917 with the MkIV pattern that continued as the main pattern until the Lee Enfield was retired from military service. I'm not sure when the MkII fell out of use. In practice I find the MkII chargers work best in my rifles, followed by the MkIV. But I think the MkII was considered flimsy in service because the back is really not as rigid as a MkIV charger.

Next item is fairly common. The Lee Enfield action cover. These entered service in WW1, but were used through WW2 and beyond. Generally the WW2 made ones fit the No.1MkIII, No.1MkV and No.4 rifles interchangeably, but the WW1 made ones are generally to small to fit over the No.4's rear sight aperture (in my experience). I have no idea how much these were actually used in WW2, as it was not really a muddy trench war (which they were developed for). This one is a 1943 Canadian made piece.

h1CuXc0.jpeg

ZMcC9cx.jpeg


And last for today, some cool old WW1 era Dominion Arsenals military blanks. These are all made from 1915 and 1916 casings, two of which are uncommon Gallery Practise cases re-purposed as blanks.

AKCCQ2D.jpeg

sY8T6n5.jpeg
Hi John, “pics or it never happened” is ultra common forum language across a variety of platforms and it’s usually seen as a fun and good natured way of asking for photos. It’s not intended as a slight or offence. I apologize if you took it as such.
Thought collectors may like to view these 2 action covers. On the left is a commercial Parker Hale with clean canvas and
plated snaps. On the right a 1915 Canadian cover made by Mills Equipment Co. Just try to find either.
 

Attachments

  • P1020888.JPG
    P1020888.JPG
    90.8 KB · Views: 5
  • P1020889.JPG
    P1020889.JPG
    113.3 KB · Views: 5
  • P1020890.JPG
    P1020890.JPG
    194.6 KB · Views: 5
Thought collectors may like to view these 2 action covers. On the left is a commercial Parker Hale with clean canvas and
plated snaps. On the right a 1915 Canadian cover made by Mills Equipment Co. Just try to find either.
The truly rare SMLE steel Sight/Muzzle Cover. Also called the Flanders mud flap. "Gun Jesus" popped by one day to take videos of some of my specimens. He took a video of the SMLE and GEW 98 night sights. Pic #2 and #3 below are pics of the front of that rifle. A FW video is on the internet. Covers are made by Birmingham contractors. A rarely seen appliance. John T.
 

Attachments

  • SMLE Night Sight front LS.JPG
    SMLE Night Sight front LS.JPG
    63.1 KB · Views: 15
  • SMLE NIGHT Sight Front (2).JPG
    SMLE NIGHT Sight Front (2).JPG
    83.8 KB · Views: 15
  • P1000631 (4).JPG
    P1000631 (4).JPG
    98.1 KB · Views: 15
Here's some of my collection that was handy. The ventometers probably straddle the boundary of use between Martini and Lee Enfield.
The muzzle protector No2 is actually Canadian marked. I was fortunate to find it. The .22 headspace gauges are modern issue gauges for the C No 7.

IMG_6832 Large.jpeg
 
Not sure if this entry will turn out properly. My MOST used Enfield tool is the spring balance. The first pic shows a device for the SMLE rifle, Ross rifle, and Lewis Gun. The SMLE tool works best on the Mk I cocking piece. I use it to test and adjust trigger pressure which I desire to be 3 lbs 1st pressure and 5 lbs second pressure. Tool is used to test pressure of all springs including the vertical pressure of the No.4 barrel as it rests on the fore. The Ross tool hooks into the rear firing pin hole to
check mainspring. The Lewis tool has an additional pointed punch to assist in removal of the body lock pin and a screwdriver
end to adjust the clock spring sprocket. At one time I had a similar spring balance for the FN L1 but sold it. John T.
Okay I have a scale looks just like these ones except has a ring on the end goes 0 to 16 . Only mark on it is a arrow and the letters WD is it related to these in any way and are they worth anything. I paid a few dollars for it at auction only because it was gun related .
 
Okay I have a scale looks just like these ones except has a ring on the end goes 0 to 16 . Only mark on it is a arrow and the letters WD is it related to these in any way and are they worth anything. I paid a few dollars for it at auction only because it was gun related .
Thanks for your inquiry but I need a pic or two to try to figure it out. Home mail is john904T@gmail.com
 
Not sure if this entry will turn out properly. My MOST used Enfield tool is the spring balance. The first pic shows a device for the SMLE rifle,
Not sure if this entry will turn out properly. My MOST used Enfield tool is the spring balance. The first pic shows a device for the SMLE rifle, Ross rifle, and Lewis Gun. The SMLE tool works best on the Mk I cocking piece. I use it to test and adjust trigger pressure which I desire to be 3 lbs 1st pressure and 5 lbs second pressure. Tool is used to test pressure of all springs including the vertical pressure of the No.4 barrel as it rests on the fore. The Ross tool hooks into the rear firing pin hole to
check mainspring. The Lewis tool has an additional pointed punch to assist in removal of the body lock pin and a screwdriver
end to adjust the clock spring sprocket. At one time I had a similar spring balance for the FN L1 but sold it. John T.

Ross rifle, and Lewis Gun. The SMLE tool works best on the Mk I cocking piece. I use it to test and adjust trigger pressure which I desire to be 3 lbs 1st pressure and 5 lbs second pressure. Tool is used to test pressure of all springs including the vertical pressure of the No.4 barrel as it rests on the fore. The Ross tool hooks into the rear firing pin hole to
check mainspring. The Lewis tool has an additional pointed punch to assist in removal of the body lock pin and a screwdriver
end to adjust the clock spring sprocket. At one time I had a similar spring balance for the FN L1 but sold it. John T.
Canadian Made Tools. Top is a beautifully made set for the Mk II cocking piece. That is you hold the cocking piece in the set
and with the other hand use the firing pin spanner to unscrew firing pin while set in the bolt. Great to use when you have no vice. On the left is a standard No 2 British made rod guide(in a previous link) for the muzzle to compare to the smaller Canadian tool on the right which works just fine for the #4 and/or #7. The barrel diameter is too large on the No.4 and No.7 rifles for the No. 2 tool to fit onto. Both Canadian tools are un marked. Never assume the M&D supplied all tools to armourers. The one that taught me had to enroll in a night shool at a local high school every year to get access to the tooling he needed. I also have firing pin protrusion gauges probably made in similar conditions for a series of Canadian service arms. Canadian tools are unmarked. John T.
 

Attachments

  • P1020891.JPG
    P1020891.JPG
    175.8 KB · Views: 2
  • P1020892.JPG
    P1020892.JPG
    160.3 KB · Views: 2
Last edited:
Canadian Made Tools. Top is a beutifully made set for the Mk II cocking piece. That is you hold the cocking piece in the set
and with the other hand use the firing pin spanner to unscrew firing pin while set in the bolt. Great to use when you have no vice. On the left is a standard No 2 British made rod guide(in a previous link) for the muzzle to compare to the smaller Canadian tool on the right which works just fine for the #4 and/or #7. Both Canadian tools are un marked. Never assume the M&D supplied all tools to armourers. The one that taught me had to enroll in a night shool at a local high school every year to get access to the tooling he needed. I also have firing pin protrusion gauges probably made in similar conditions for a series of Canadian service arms. Canadian tools are unmarked. John T.
Aim Correctors. Top is obviously an unmarked aim corrector for the #3 (P-14) rifle. The bottom tool is aim corrector that attaches to the Mk I sight on a No.4 rifle. Package on the right is the same tool NOS marked Aim Corrector and what appears to be a date of 9/67 in pencil and stores marks too small for me to read. John T.
 

Attachments

  • P1020893.JPG
    P1020893.JPG
    165.4 KB · Views: 4
  • P1020894.JPG
    P1020894.JPG
    115 KB · Views: 4
Aim Correctors. Top is obviously an unmarked aim corrector for the #3 (P-14) rifle. The bottom tool is aim corrector that attaches to the Mk I sight on a No.4 rifle. Package on the right is the same tool NOS marked Aim Corrector and what appears to be a date of 9/67 in pencil and stores marks too small for me to read. John T.
Long Branch Tooling. At the top is the bit for the brace and bit to remove the butt stock bolt. C broad arrow stamped.
At the right is the usual firing pin protrusion gauge. Top longitudinal gauge is 301 bore gauge which I have assumed it is for the Model 1917 30-06 rifle of which Canada bought 100,000 during WW2. Bottom gauge is .303 bore gauge. All three hardened tools are electropencilled C broad arrow. John T.
 

Attachments

  • P1020896.JPG
    P1020896.JPG
    56.4 KB · Views: 7
Figured I'd post some bayonet stuff. First up are the socket bayonets for the No.4 rifle. (I'm omiting the No.7 on purpose in the first photo so the rest fill the screen)

a0sqyLg.jpeg


Left to right:

-1941 Singer Manufacturing cruciform No.4MkI bayonet with typical machined and dated scabbard. This bayonet was also made as a trials bayonet with more elaborate markings, but I don't have one and the number out there is vanishingly small.
-1941 Singer Manufacturing non-cruciform No.4MkII bayonet also with typical machined and dated scabbard. Not long into 1941, production was changed to the spike we all know and love, but retained the marking scheme of the No.4MkI bayonet - subsequent makes/manufacturers omitted the GR/cypher markings.
-mid-war (undated) Savage No.4MkII bayonet - this is the type of No.4MkII bayonet you will typically encounter everywhere, with a variety of manufacturer markings. Generally won't be as nicely finished as an early singer bayonet, but still with a body forged from 1 piece. In this case, it's got what some people call a "victory" scabbard, made of bakelite in the US for lend lease. Originally there was a riveted-on (non-replaceable) web loop to serve as a frog, but like many of these, it's missing from my example.
-mid-war No.4MkII* bayonet - this differs from the MkII in that the spike is a separate piece swaged into the socket forging. This cut cost and allowed further distribution of manufacture to more factories. The MkII* was approved in late 1941, but most would be made 1942+. Functionally it's like a MkII and apart from markings, they can be hard to discern from a MkII. Often you can see the outline of the inserted spike on the back of the socket, where the metals blued a different hue. There is often also a pronounced shoulder where the spike meets the socket body, but some real MkII bayonets are also machined that way, so not foolproof. This example has a wartime expedient steel tube scabbard with a brazed on end piece marked S191 (i.e. manufactured by the Franco-British Electrical Company).
-Late war (1944) No.4MkIII bayonet. Socket is made from castings and stamped and welded forging, and a separate MkII* style spike was welded in place. Usually these are finished in something akin to black phosphate, though they are often also suncorite painted. Comparatively few of these were made, as by the time production got rolling, lots of MkII and MkII* bayonets were in service, and these maybe would not have inspired a lot of confidence in the troops (i.e. they look cheap). This one is depicted with the late war MkIII plastic scabbard, which is also uncommon.
-post-war No.9 bayonet. These were all made post-war and essentially used the No.5 blade attached with a No.4MkII* type socket. They used the same scabbard as the No.5 and No.7 bayonets which were made with either a steel or gunmetal chape.

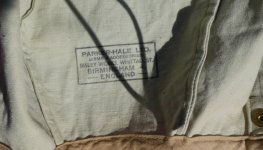
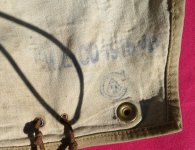
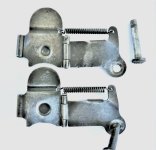
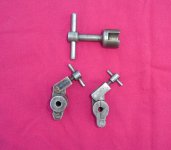
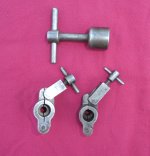
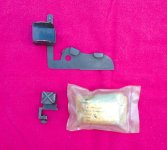
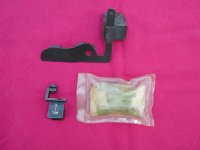
For those curious, here is a closeup of the markings difference between a singer no.4MkI and no.4MkII bayonet:
3qdd71b.jpeg


Some folks will say the spacing would indicate it should be SMC marked. All the examples I've seen are just SM marked, so either it was never there, or the stamping die broke early on and the C machined off to keep the die in service - who knows?

Also, scabbards got mixed around in service, so you can find any model with any scabbard - they all interchange.
 
Now for the No.5 and No.7 bayonets...

pjlPW45.jpeg


Top bayonet is an M47/B No.7MkI/L bayonet, this one was made by BSA sometime between 1945 and 1948. These were originally designed for the Sten MkV, but were also briefly issued with the No.4MkI rifle, and later were used with the Sterling SMG. You can imagine why the No.4 rifle issue was short-lived, because you could install the bayonet such that the bullet would impact the grip (i.e. soldier forgets to swivel the socket upward) with predictable results. It did soldier on on ceremonial rifles. The ring on the ricasso is because they used No.5 bayonet ricassos for these. It's just there to shoot through.

Bottom bayonet is a wartime Wilkinson Sword (WSC) No.5 bayonet, obviously for issue on the No.5MkI rifle.

Blade markings on each (I forgot to photograph the No.7 manufacturer mark, but it's a WW2 manufacturer code stamped on the socket itself. In this case, it's marked M47/B and UK with a broadarrow).

Us3xj4T.jpeg
xioJkDx.jpeg
 
Last edited:
...

Top bayonet is an M47/B No.7MkI/L bayonet, this one was made by BSA sometime between 1945 and 1948. These were originally designed for the Sten MkV, but were also briefly issued with the No.4MkI rifle, and later were used with the Sterling SMG. You can imagine why the No.4 rifle issue was short-lived, because you could install the bayonet such that the bullet would impact the grip (i.e. soldier forgets to swivel the socket upward) with predictable results. It did soldier on on ceremonial rifles. The ring on the ricasso is because they used No.5 bayonet ricassos for these. It's just there to shoot through.

....
I can only imagine the arguments and bluster around the small arms board tables with one side harping on about proper training and enforcing discipline, and the other side rolling their eyes at having to withstand another 5-watt idea from the supposed experts. Not all small arms decisions in wartime Britain were proven to be smart.
 
Now for the No.5 and No.7 bayonets...


Top bayonet is an M47/B No.7MkI/L bayonet, this one was made by BSA sometime between 1945 and 1948. These were originally designed for the Sten MkV, but were also briefly issued with the No.4MkI rifle, and later were used with the Sterling SMG. You can imagine why the No.4 rifle issue was short-lived, because you could install the bayonet such that the bullet would impact the grip (i.e. soldier forgets to swivel the socket upward) with predictable results. It did soldier on on ceremonial rifles. The ring on the ricasso is because they used No.5 bayonet ricassos for these. It's just there to shoot through.
I have my 1948 Poole manufactured No.7 MK-1-L mounted for display on a 1950 Long Branch No4 Mk1*. The muzzle sits just enough proud of the socket to prevent the bayonet from being installed improperly or being turned when installed properly.
 
Back
Top Bottom