











































Tikka recoil lug bedding

g3arhead

Member
Rating - 100%
23   0   0
Hey all,

Ever run into this?

Test fitting my (aluminum) recoil lug into this Tikka laminate stock. Lug area is not allowing me to fully press in my recoil lug.

I was tapping in my lug and it simply won’t flush. I did find that some of the wood fibres are catching the bottom edge and snagging the lug from travelling down.

Goal is to use a new titanium recoil lug and bed it in there.

I’m thinking to use a drill and remove some small bit of material . These aftermarket lugs are oversized slightly so I might need to trim a bit to get it to fit.

Question is , anyone ever drilled material away to get this thing to fit? I’m conscious of the fact that I can’t drill TOO far down.
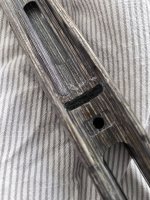
1774705363524.jpeg
 
Yes, you can open the channel up some to allow the lug to fit better as well as some space for bedding compound. Dremel is easier to get in there rather than a drill. I believe the lug protrusion measurement is around .093”.
 
Use a chisel, relatively fast to do and less chance of a screw-up. Since you are bedding be sure there is room for the lug and the bedding material. I would leave the rear edge of the recess alone and remove material from the sides, front and bottom.
 
Yes I am.using some bedding compound. I guess a light layer will be sufficient given the tight fit .

I heard some even just fully cover the lug with bedding.
I think I didn't explain myself properly. How are you going to ensure the proper depth of the recoil lug in your stock? It has to protrude the proper hight to engage fully in the receiver slot. I've heard of guy gluing the lug to the action with a drop of crazy glue so it stays in place when you insert the action back in the stock. Once the epoxy sets the drop of crazy glue breaks off easily.
 
I think I didn't explain myself properly. How are you going to ensure the proper depth of the recoil lug in your stock? It has to protrude the proper hight to engage fully in the receiver slot. I've heard of guy gluing the lug to the action with a drop of crazy glue so it stays in place when you insert the action back in the stock. Once the epoxy sets the drop of crazy glue breaks off easily.
I didn’t think I’d even need to do that. Using my old lug, (which has an indent now, so I can see how high it should protrude from the stock) I was thinking I could just remove a bit of material, test fit, rinse and repeat until I get the desired depth.
 
I didn’t think I’d even need to do that. Using my old lug, (which has an indent now, so I can see how high it should protrude from the stock) I was thinking I could just remove a bit of material, test fit, rinse and repeat until I get the desired depth.
As soon as you start removing material from the stock your lug will be too low. You’ll need a reference point somewhere to gauge the depth. Lug too low and you’ll have minimal engagement with your action. Lug too high and you’ll now have a teeter totter.
 
Use a depth micrometer measuring from the edges of the stock down. Take a reading on the old lug and transfer that measurement to the new lugs depth. A bit of tape applied to the stock will help you place the mike in the same place each time. Measure in numerous places.

If you don't have a depth micrometer you can use a piece of wood with a screw inserted as a makeshift tool. Grind the point to a flat.
 
X2 on the glue. Done it a few times, a tiny drop, it’s unnoticeable when pulling the action from the bedded stock but keeps your lug perfect.
 
Back
Top Bottom