


Sometimes I should just leave things alone.
Thought I would clean my brand new Tikka T3x TAC A1 Bolt. How hard could it be right? Watched a couple of YouTube videos before attempting this. First time I tried this, I turned it the wrong way and the thing got caught in that "detent" part of the rear end of the bolt. Thankfully there was the plastic tool piece in the box with which I could use to turn the bolt so I could remove everything.
Removed everything, cleaned it and then that's where the challenge started. In watching the video I got everything back together until I had to put the bolt shroud back on (it was the last step) and then all videos said to tighten it towards you and it should click and stay in place. Mine wouldn't come towards me - instead I turned it away from me and it clicked but then the shroud fell off.
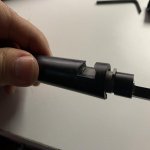
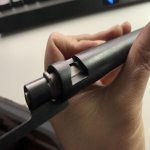
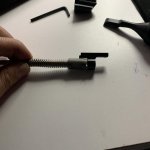
Been trying to figure this out now for an hour and this is when I realized having no handy skills is not great. But the problem now is that the firing pin and spring no longer moves up and down. Not sure what I did but it looks like it is in some "cocked" position. See photos. There is supposed to be a gap in between the grey part and the black part for me to put in an allan key but as you can see, my gap is gone and the whole springiness of everything is gone. I tried holding the grey piece and turning the black piece but nothing is causing the spring to pop back up. As a result when I put it back into the bolt assembly, the grey piece doesn't quite align with the cut out there, so I can't even put the bolt handle back on in order to keep it in place so I can use an allen key to turn it (I can't get the allen key in anywhere as the hole is no longer there).
I guess I am trying to figure out how to decompress the firing pin spring here so I can start over again.
Any help would be appreciated. Thanks.
EDIT: So it looks like the problem here is that grey collar thing is not moving up and down - whatsoever...in this video someone is pushing it down, compressing the spring to get the handle on. I don't have a vise but even in using a flat head screwdriver to try to move it, it's not budging at all.
https://www.facebook.com/Gunworks-1...ng-pin-remove-from-bolt-body/1929651367049926
You can see below on mine the problem. Most Youtube videos indicate to put an allen key in that hole/gap before turning the shroud. The first turn keeps the allen key tightly locked as it is the only thing holding that spring from decompressing.
Man I so regret taking this apart. I only shot 100 shots out of the rifle so far.


Here's the video I used for the take apart...you can see where you are supposed to use the allen key:
[youtube]tueO_VECyno[/youtube]
This guy here - he took the bolt and firing pin out and you can see him moving the collar up and down with the spring (watch from about the 2:45 mark to about the 3:45 mark). Mine doesn't do that - it doesn't move at all.
[youtube]-1v1nGMTNBo&t=152s[/youtube]
Thought I would clean my brand new Tikka T3x TAC A1 Bolt. How hard could it be right? Watched a couple of YouTube videos before attempting this. First time I tried this, I turned it the wrong way and the thing got caught in that "detent" part of the rear end of the bolt. Thankfully there was the plastic tool piece in the box with which I could use to turn the bolt so I could remove everything.
Removed everything, cleaned it and then that's where the challenge started. In watching the video I got everything back together until I had to put the bolt shroud back on (it was the last step) and then all videos said to tighten it towards you and it should click and stay in place. Mine wouldn't come towards me - instead I turned it away from me and it clicked but then the shroud fell off.
Been trying to figure this out now for an hour and this is when I realized having no handy skills is not great. But the problem now is that the firing pin and spring no longer moves up and down. Not sure what I did but it looks like it is in some "cocked" position. See photos. There is supposed to be a gap in between the grey part and the black part for me to put in an allan key but as you can see, my gap is gone and the whole springiness of everything is gone. I tried holding the grey piece and turning the black piece but nothing is causing the spring to pop back up. As a result when I put it back into the bolt assembly, the grey piece doesn't quite align with the cut out there, so I can't even put the bolt handle back on in order to keep it in place so I can use an allen key to turn it (I can't get the allen key in anywhere as the hole is no longer there).
I guess I am trying to figure out how to decompress the firing pin spring here so I can start over again.
Any help would be appreciated. Thanks.
EDIT: So it looks like the problem here is that grey collar thing is not moving up and down - whatsoever...in this video someone is pushing it down, compressing the spring to get the handle on. I don't have a vise but even in using a flat head screwdriver to try to move it, it's not budging at all.
https://www.facebook.com/Gunworks-1...ng-pin-remove-from-bolt-body/1929651367049926
You can see below on mine the problem. Most Youtube videos indicate to put an allen key in that hole/gap before turning the shroud. The first turn keeps the allen key tightly locked as it is the only thing holding that spring from decompressing.
Man I so regret taking this apart. I only shot 100 shots out of the rifle so far.
Here's the video I used for the take apart...you can see where you are supposed to use the allen key:
[youtube]tueO_VECyno[/youtube]
This guy here - he took the bolt and firing pin out and you can see him moving the collar up and down with the spring (watch from about the 2:45 mark to about the 3:45 mark). Mine doesn't do that - it doesn't move at all.
[youtube]-1v1nGMTNBo&t=152s[/youtube]
Attachments
Last edited:


