










































To paint or not to paint - 3pos safety Rem700

Canuck65

Regular
Super GunNutz
Rating - 100%
41   0   1
Location
Ontario
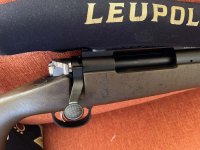
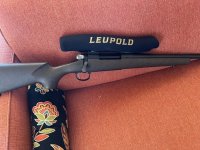
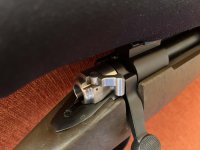
PTG 3-position on a Remington 700 AWR. LOL only took about 10 trips back and forth to the milling machine to dial everything in just right.

I can't stand actions that don't lock when the safety is engaged - all my other rifles do. I was tempted to just sell the Remington and buy a Winchester, but there's something I really like about this Remmy. Fits me perfect, and it's incredibly accurate (which surprised me). Plus I've put a lot of time into bedding, developing a load, etc.

What do you think? drop the $150 to Cera the bolt shroud or just leave it the way it is?
 

Attachments

  • IMG_1278.jpeg
    IMG_1278.jpeg
    81.6 KB · Views: 73
  • IMG_1279.jpeg
    IMG_1279.jpeg
    141.9 KB · Views: 73
  • IMG_1280.jpeg
    IMG_1280.jpeg
    214.9 KB · Views: 73
  • Like
Reactions: DGY
Did you tell them it is two small parts, a safety lever and a bolt shroud, with no disassemble or assembly required.

Seems to me $150 is high
Yep. Seemed scammy. That’s why it’s still shiny and silver.

I’ll probably get it coated. I don’t mind it silver, but seems unfinished when I look at it.
 
What about just painting it a mat finish?
Maybe get quotes at other places?
It is such a small piece that you could send it anywhere in Canada for minimal cost.
Just ideas
Oh and great job!!
 
What about just painting it a mat finish?
Maybe get quotes at other places?
It is such a small piece that you could send it anywhere in Canada for minimal cost.
Just ideas
Oh and great job!!
I was pretty surprised at the quotes I got honestly. My thinking is, why not just do it alongside a larger project. I wouldn't do a small part like this on it's own. $50 seems about fair to me if the shop is already set up to do a bunch of other coating anyway. I guess everyone's got to make money though. Thanks.

I know there are do-it-yourself kits for touch ups and small parts, but I don't hear great things about them.
 
  • Like
Reactions: DGY
OP,
Did you use the 45degree striker/cocking piece or the OEM?

The OEM would require machining 1/2 of the 3/32" cross pin holding the striker/cocking piece to the firing pin.

The 45 degree relocates the cross pin.

Be advised-
The firing pin needs to be cocked to activate the safety, unlike a Winny/Mauser.
 
OP,
Did you use the 45degree striker/cocking piece or the OEM?

The OEM would require machining 1/2 of the 3/32" cross pin holding the striker/cocking piece to the firing pin.

The 45 degree relocates the cross pin.

Be advised-
The firing pin needs to be cocked to activate the safety, unlike a Winny/Mauser.
Yes, I bought a second firing pin and cocking piece so that I could put it all back to original if I want to. I machined the cocking piece and also needed to remove a bit of material on the firing pin shank as well. PTG sells a kit that’s most of the way there, but they told me it would still require fitting. So if a guy has to machine the firing pin and cocking piece anyway, why pay the extra for theirs? It’s not a difficult job if you know which is the business end of a dial indicator and can do even basic work on a milling machine.

Anyway, yes the cocking piece is cut. The safety lever wouldn’t move at all if it wasn’t.
 
Back
Top Bottom