For this kind of stuff, you might consider buying a copy of
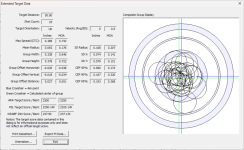
OnTarget TDS (clickable link) so you can print out some of the ARA practice targets (target #7) to get very accurate results and useful stats. If you don't mind printing in colour you can shoot one shot per bull on those targets and then scan it in with the program. It will then do its best to find all of the bullet holes and automatically score the target, and you get output as seen below. It will show you the max spread (the least useful number that every one should simply ignore), but also many more numbers that are actually useful and helpful. Mean radius is much more useful than max spread. Max spread ignores all but two shots, even in this 25-shot case. It doesn't really tell you much. Mean radius, however, takes all shots into account, and gives you a very good idea of what is actually going on. Combining that with the SD radius number gives an even better picture. You can even negate the effects of wind for those windy test days by looking at group height combined with SD Y. Group height on its own is about as useful as max spread, but taking SD Y into consideration along with it helps make it a lot more useful, and you are basically ignoring wind, other than the small amount that wind will affect elevation on target. It doesn't have zero effect, obviously, but its effect on elevation is a lot smaller than its effect on windage.
ARA targets are one shot per bull, with 25 bulls, and a max score of 2500. Here you can see two ARA scores. One is 2300, which is the actual score as shot. And the other is 2350, which is the best the score could have been, if the overall group's centre were moved to match the target's centre. This is very useful for determining just how good your scope zero actually is. If you shoot a target and hold centre, ignoring wind, you can then use the group horizontal offset and group vertical offset to really dial in your scope zero. In this case, I'm already dialled in as well as I can be, as both horizontal and vertical are off by less than 0.04 MOA.
The program works very well, but as I mentioned, for this target you do need to print in colour. The bullet hole finding algorithm is trained based on the original colour of each of its targets. It does, however, contain a few targets that are black and white, and so the bullet hole finder will still work with those other targets. If you want to stick with one of the colour targets but print it with a black and white printer then the bullet hole finder will not work if you scan those targets. However, you can still scan it and then find and place bullet holes manually in that case. It's just much quicker to spend a little extra for colour targets and let it scan and find them for you. Sometimes it has trouble and you have to place one of the holes or adjust its position a little manually, but most of the time it finds them successfully. It is a huge time saver overall, and makes for measurements that are about as good as one could expect. In this example, the 25-shot group has a mean radius of 0.092" or 0.176 MOA, or a mean diameter of 0.184" or 0.352 MOA. Not too shabby for 25 shots. That score of 2300 means the worst/outside edge of just four of the shots broke the line for the 0.5" centre bull, and the best score of 2350 means if centred up properly only three would have done so. Pretty close to a perfect score, yet, so far, hehe.
View attachment 980157

