I saw that place in my searches! But they had this on one of their listings:
Sorry, we are unable to do any international sales of firearms parts due to excessive cost and regulations.
Dang, sorry - I did not see that.


I saw that place in my searches! But they had this on one of their listings:
Sorry, we are unable to do any international sales of firearms parts due to excessive cost and regulations.
Dang, sorry - I did not see that.
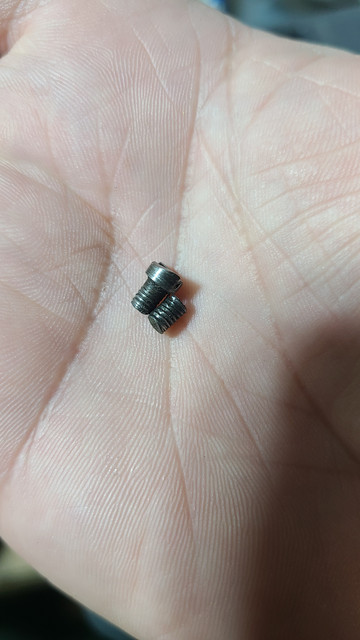
I took the trigger guard of my Webley Mk6 and measured the screws, the front one looks like an 8-36 should do the trick.
Long time ago I made one, lots of dicking around but managed to make one using a very adjustable metric 4mm die, 07. tread pitch and kept adjusting the die down to 3.55 mm and that did the trick.
The rear trigger guard screw has the same thread pitch (36/inch) but is 3.75 mm in diameter, don't what # screw that would be in SAE.
Hope this helps.
If the Mk6 screw does indeed work (let me know if you want me to check - I have both a Mk6 and a RIC) then Numrich has guard screws in stock and ships to Canada.


On mine they are not _quite the same from the looks of things
shorter one is from the RIC longer from the MkVI though I checked and all of my MkI (* and not) II IV and VI use the same long screw.
But the mk6 fits and could be made to work with some cutting and hand filing..
I took the trigger guard of my Webley Mk6 and measured the screws, the front one looks like an 8-36 should do the trick.
Long time ago I made one, lots of dicking around but managed to make one using a very adjustable metric 4mm die, 07. tread pitch and kept adjusting the die down to 3.55 mm and that did the trick.
The rear trigger guard screw has the same thread pitch (36/inch) but is 3.75 mm in diameter, don't what # screw that would be in SAE.
Hope this helps.
4gr unique is a very mild charge. Are you using anything other than hollowbase bullets? Have you been deep seating your handloads by any chance? IIRC Ellwood Epps has an inhouse gunsmith who specializes on antique handguns, might want to give them a call.
Left hand twist drill bits are often very effective at backing broken screw shanks out. An "easy out" can expand the diameter of the shank, making it more difficult to remove.
I wonder if you could epoxy a shank ( I am thinking allen key) in the hole and get enough purchase to back the screw out. It would be a good test for one of the liquid steel epoxies. Degrease first if you used a lubricant.
As of now i just have the shank drilled out with a left handed bit, it didnt grab strong enough to unscrew it. So i gotta get an easy out for the rest. Once it is out i will confirm the rear screw fits into the front hole (thats what she said!) and if it does i will be able to try to find someone to make a new one or compare it to anything i order to make sure i dont end up getting 25 screws lol
Moe, the head of the screw sheared from the shank. I could go over it with a magnet but i dont think that will help anything really. I have the rear screw and the heads looked identical. (Maybe length is different?)
Yeah. Better idea is to befriend a Dentist, and stock up on carbide Dental Burrs (the cutters they use to carve your cavities out) In an air pencil or Dremel tool, they are easy to use to cut a new screwdriver slot in the broken off remains, as a starting point!


