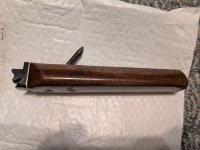
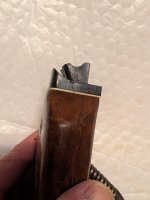
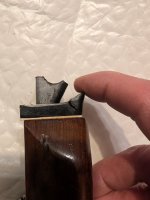
That's a pretty common problem with that era of single shots. There are so many good adhesives available the trick is finding something that bonds nicely with that plastic. You need to remove it from the stock and degrease the plastic and get it nice and clean.
If you can separate the parts you can scuff up the contact points to increase the bite and improve adhesion.
I bought a plastic welder kit last year that's pretty cool if you can get at the back of the part you can embed some metal wire or mesh into the plastic to re-enfore the crack.
I'd glue it together and then think about beefing it up from the hidden sides with a plastic welder if the access is easy.
For the epoxy your going to need to clamp it for a bit. My clamp of choice for weird shapes like that would likely consist mostly of quality electrical tape (3m) and stretch it over and pull tension as needed where needed. Clamping is a creative art all of it's on and most people don't think about how they are going to hold things together until they have glue applied. Figure out the clamping in advance....

Here's a Perplexity search on suitable adhesives,
What's a good adhesive for black plastic from the late 60's early 70's?
For black plastic from the late 60s or early 70s, a good first choice is a
two-part epoxy made for plastics, especially a flexible or impact-resistant one. If you want a faster option for small repairs, a plastic-specific cyanoacrylate, such as a product formulated for hard-to-bond plastics, can also work well.
What usually works best
- Two-part plastic epoxy: best all-around choice for strength and gap filling on older plastic parts.
- Plastic-specific CA glue: good for tight cracks or small broken edges, but usually less forgiving than epoxy.
- E6000 or similar flexible adhesive: useful if the part needs some flex and vibration resistance.
What to check first
Older black plastics from that era can be different materials, and some are hard to bond well. If the part is
polypropylene or polyethylene, many common glues won’t hold reliably, while styrene and some rigid plastics bond much better.
Practical prep
- Clean the surface thoroughly with mild soap and water, then dry it.
- Lightly roughen the bonding area with fine sandpaper.
- Test the adhesive on an unseen spot first if the plastic is valuable or fragile.
- Use clamps or tape to hold the part still while curing.
Best starting pick
If you want one safe recommendation without knowing the exact plastic, use
J-B Weld Plastic Bonder or a similar two-part plastic epoxy. It’s generally the most dependable starting point for vintage black plastic repairs.
If you want, I can narrow it down based on whether the part is
hard and rigid,
slightly flexible, or
brittle and cracked.
Hard and rigid, cracked
For
hard, rigid, cracked old black plastic, a two-part
plastic epoxy is the best starting point. It gives you strength and gap-filling, which matters more than instant grab on a crack.
Best choice
- Loctite Epoxy Plastic or a similar two-part plastic epoxy for hard plastics.
J-B Weld Plastic Bonder / PlasticWeld is also a solid option for rigid vintage plastic repairs.
How to use it
- Clean the crack well.
- Lightly roughen both sides of the joint.
- Work the adhesive into the crack, not just on the surface.
- Clamp or tape it in position until fully cured.
If the crack is hairline
A plastic-specific cyanoacrylate can work for a very tight crack, but epoxy is usually safer on brittle vintage parts because it fills better and tends to be stronger on stressed repairs.
One caution
If the plastic is something like polyethylene or polypropylene, many common adhesives won’t hold well; those need special prep or a different repair approach. If you know the item’s plastic type, I can narrow it to the best exact product