Thought I'd start a new thread since many have been picking these up with the Tenda. I got one of each of the shorties and the 22". Here's a few pictures of what I've been seeing:
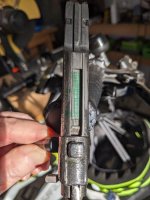
Picture "245" of the top of the sear channel on the bolt underside: I just used a green marker to lay down some colour. Cycled the bolt 20 times...note the drag evidence on the left where the sear is making contact. This is what seems to cause the sticky bolt rear pull. Touch the base of the trigger to feel the "judder" as you cycle the bolt.
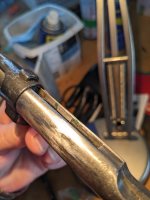
Picture "202" of the sidewall of the sear channel: Note the weird block of protuding rough machining marked in green..zoom in and you'll see it looks like an embedded piece of file! This will polish out easily. Could likely just be left also.
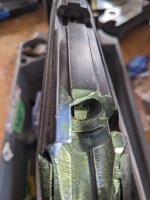
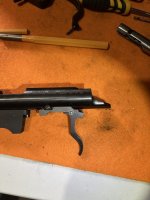
Last picture of the sear itself: there's no sign of misalignment where the left side is riding high.. but it doesn't take much. Solution is to try to get the trigger adjustment screw to move ( without stripping the head ) to drop the sear a touch or failing that, a bit more polishing of the channel and maybe a touch off the sear.
Anyway, please share your experiences/ comments. BTW, both bolts are moving MUCH smoother just with 20 minutes work each.
Picture "245" of the top of the sear channel on the bolt underside: I just used a green marker to lay down some colour. Cycled the bolt 20 times...note the drag evidence on the left where the sear is making contact. This is what seems to cause the sticky bolt rear pull. Touch the base of the trigger to feel the "judder" as you cycle the bolt.
Picture "202" of the sidewall of the sear channel: Note the weird block of protuding rough machining marked in green..zoom in and you'll see it looks like an embedded piece of file! This will polish out easily. Could likely just be left also.
Last picture of the sear itself: there's no sign of misalignment where the left side is riding high.. but it doesn't take much. Solution is to try to get the trigger adjustment screw to move ( without stripping the head
) to drop the sear a touch or failing that, a bit more polishing of the channel and maybe a touch off the sear.Anyway, please share your experiences/ comments. BTW, both bolts are moving MUCH smoother just with 20 minutes work each.