Leuchtkafer
Member
When I tested out the new IBI barrel a few months ago in the winter, I noted an excessive amount of Fail-To-Fire. I chalked it up to the cold at the time. It is no longer winter and the issue persists. This warranted further investigation. I harvested a box of once-fired cases for testing/diagnosis purposes. Oddly enough, there was not a single malfunction with this ammo, SK Semi-Auto. Some ammo has more failures than others, the worst offender is RWS Rifle Match and this crosses over to my CZ PRS rifle. This issue could be slightly complex, combining firing pin penetration and headspace sensitive to rim thickness, given tight below SAAMI spec headspace which may be crushing some rims, possibly disturbing priming compound. This is a work in progress and I will go through the data and results as I document them. I haven't measured the ammo yet to gain any insight into rim thickness correlation to the malfunctions, but I will do so in the near future.
I performed a case head penetration test is several conditions; As-Is uncleaned, given I've had the rifle some 8-9 years and never fully disassembled the bolt to clean and lubricate. This involves punching out a cross pin so it's not user-friendly regular maintenance, Anschutz just says add a drop of oil to the striker pin exposed at the cocking piece end. I need a baseline to determine what effect any work from here that I do has. Second test cleaned, lubricated and polished, but installed unintentionally in the opposite orientation. It shouldn't matter since the part should be symmetrical, but it did make a difference. Cleaned, lubricated, polished in original orientation, and finally with a new striker spring. Here is the data.

This is the test setup, I positioned the once-fired case with the hit at the 6-o'clock orientation in the chamber, then held the trigger and gently closed the bolt so the firing pin would rest on the rim. I set the dial indicator to zero. I re-cocked and "fired". The difference between the readings is the case head penetration.

"Fired"

Disassembly

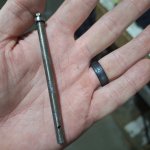
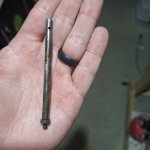
In the following two images I note some wear on the striker pin that I can catch a fingernail on, and the diameter is reduced by 0.0005" in the area shown in the second image.


A breakdown of the bolt parts

After polishing, there are gouges revealed that are too deep to practically remove without major alteration to the spec dimensions

A gouge formed on the opposite side from only 10 "firings" when the pin was installed in the other orientation. This suggests the pin is made of inappropriate metal for the application or a bad batch, either way, not impressed.

Here's where I'm at; Cleaning, lubricating, polishing and even a new spring made effectively no difference in ignition consistency or penetration depth. The gouges formed/forming in the striker pin seem to be the primary issue. The number I get for "penetration" is not definitive, it is relative. There are a variety of ways to test and measure penetration, what matters is for whatever method one uses, one notes the number where Fail-To-Fire occurs and the number where there are no malfunctions.
My plan now is to manufacture a new striker pin part #002832 out of a harder grade of steel and with modified dimensions to compress the spring a little more. This is to store more energy and thus get my penetration up to 0.020". I would like the ES of penetration to be 0.001" or less, zero or a few tenths would be ideal but being a SAP design (Spring Around Pin), this is not likely. We'll see what I can get. I will also shave 0.006" off the shoulder stop of part #002827, this is to ensure that the shoulder is 0.010" off the mechanical stop at maximum case penetration, as per Bill Calfee's recommendations. Hey, another project side quest lmfao I can't ignore this though, it is important.
I performed a case head penetration test is several conditions; As-Is uncleaned, given I've had the rifle some 8-9 years and never fully disassembled the bolt to clean and lubricate. This involves punching out a cross pin so it's not user-friendly regular maintenance, Anschutz just says add a drop of oil to the striker pin exposed at the cocking piece end. I need a baseline to determine what effect any work from here that I do has. Second test cleaned, lubricated and polished, but installed unintentionally in the opposite orientation. It shouldn't matter since the part should be symmetrical, but it did make a difference. Cleaned, lubricated, polished in original orientation, and finally with a new striker spring. Here is the data.

This is the test setup, I positioned the once-fired case with the hit at the 6-o'clock orientation in the chamber, then held the trigger and gently closed the bolt so the firing pin would rest on the rim. I set the dial indicator to zero. I re-cocked and "fired". The difference between the readings is the case head penetration.

"Fired"

Disassembly

In the following two images I note some wear on the striker pin that I can catch a fingernail on, and the diameter is reduced by 0.0005" in the area shown in the second image.


A breakdown of the bolt parts

After polishing, there are gouges revealed that are too deep to practically remove without major alteration to the spec dimensions

A gouge formed on the opposite side from only 10 "firings" when the pin was installed in the other orientation. This suggests the pin is made of inappropriate metal for the application or a bad batch, either way, not impressed.

Here's where I'm at; Cleaning, lubricating, polishing and even a new spring made effectively no difference in ignition consistency or penetration depth. The gouges formed/forming in the striker pin seem to be the primary issue. The number I get for "penetration" is not definitive, it is relative. There are a variety of ways to test and measure penetration, what matters is for whatever method one uses, one notes the number where Fail-To-Fire occurs and the number where there are no malfunctions.
My plan now is to manufacture a new striker pin part #002832 out of a harder grade of steel and with modified dimensions to compress the spring a little more. This is to store more energy and thus get my penetration up to 0.020". I would like the ES of penetration to be 0.001" or less, zero or a few tenths would be ideal but being a SAP design (Spring Around Pin), this is not likely. We'll see what I can get. I will also shave 0.006" off the shoulder stop of part #002827, this is to ensure that the shoulder is 0.010" off the mechanical stop at maximum case penetration, as per Bill Calfee's recommendations. Hey, another project side quest lmfao


