Building a Classic Sporting rifle

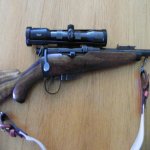
I think I would stick with the 3 folding leafs and not include the sliding sight. Looks a bit busy.

I would have skipped the leaves and the folding sight and gone with a red dot, but since its about cosmetics not practicality, but it does look busy.
 
I would have skipped the leaves and the folding sight and gone with a red dot, but since its about cosmetics not practicality, but it does look busy.

I get that ..... I've never used the sights on my rifle. Probably won't. All cosmetics and that's OK! :)

qkhI27zl.jpg
 
I have the cape sight on my Lee Speed and like it a lot.The sights line up perfectly on target as you raise the gun to your shoulderIMG_0941.jpg
 

Attachments

  • IMG_0941.jpg
    IMG_0941.jpg
    10.6 KB · Views: 221
Last edited:
Me and my daughter are doing another fly in hunt this year in northern BC I have the float plane booked. We fly in on Aug 9 and get picked up on Aug 20. We have 2 goat tags and one sheep tag. I'm putting the drive on to get this rifle done for that trip. So I hope to have it finished this summer and have some game pics.

Last time me and the same daughter did a fly in I got a goat with an iron sighted Lee Enfield no1, she now has her hunting license (13 y/o) so the main goal is getting her a goat.

This is exciting Evan! Getter done bud! I look forward to the story that’s coming!!
 
I got some more work done on the rifle.

the rear sight it now installed into the rib, i dove tailed the sight base in place then a soldered it in place. the leaf and ladder sights are still adjustable.

i polished the sear tip then installed a screw to make the rifle have adjustable sear engagement so i don't have to file it, i put some blue thread locker on it so i can be very finely adjusted.

I got the safety installed and working now. its just made of mild steel and its to soft but ill use that slide rod as a template and make one out of 4140 then harden it, with about 20 pounds of trigger force i can bend the safety rod and set the rifle off. i have no business working on that butt stock, i went so slow and it took so long lol luckily i didn't mark the finish, it went well.

did some fitting of small parts, got the bolt head back together using NOS screw, spring and extractor. The mag just slides in and out now and clips in place without any force now.


i need to buy and install the ejector screw on the side of the receiver, also make and install a half barrel band sling swivel and the sling swivel post in the butt stock (I already have that) then it's cleaning the solder off the barrel and the finish work, engraving, bluing and cch

every time i try and delete some and get the numbers down i just find each pic shows something the others don't so i keep too many.


53742504699_a41c71e739_b.jpg


53742504669_7416dc2424_b.jpg


53742592135_7923735e17_b.jpg


53741249542_3251f6a037_b.jpg


53742592105_7cbfe3a133_b.jpg


53742504469_443b522722_b.jpg


53742591975_f32d747bc2_b.jpg


53741249362_02c4fa4929_b.jpg


53742363803_b6e18bb49f_b.jpg


53742363683_2f80f98852_b.jpg


53742591765_34ec353ffa_b.jpg


53742591750_abee60bfc1_b.jpg


53742177336_25e5229809_b.jpg


53742504079_3f4334f6a9_b.jpg


53742591545_5802d69dc5_b.jpg


53742591585_bc6075dd59_b.jpg
 
Last edited:
  • Like
Reactions: Rob
Evan:

QUOTE>>>>>one thing about the rear sight is bugging me, i feel i installed to far forwards and it looks a bit off with the grip cap being right below it. it may look better when the barrel and sight are blued though.<<<<<ENDQUOTE

Horse-Puckey!!!!

The rear sights were installed all over the place; there seems to be neither rhyme nor reason where they are placed. Here is a W.W.Greener I used to own with the cape sight placed like yours:

w w greener 303.jpg

Here is a Lawn & Alder with the same set-up:

I might mention that the ones I have owned or encountered with the cape sights being mounted farther back have the longest barrels on them, perhaps to lengthen the sight plane? The ones with the sights farther forward have the short "carbine" length barrels, ie. 20 - 22".

Don't sweat the small stuff! ;-)
 

Attachments

  • w w greener 303.jpg
    w w greener 303.jpg
    103.2 KB · Views: 154
  • Lawn & Alder.jpg
    Lawn & Alder.jpg
    51.8 KB · Views: 152
Last edited:
So if I'm seeing this right, back is FIRE and forward is SAFE ? That would irritate me, it's backwards to every tang safety I've ever used. Pity you couldn't have rigged up some sort of toggle to getting working in the right direction.
 
That would require additional linkage.
Look at it this way - pull the safety back for fire, just as a hammer is pulled back to make ready.
As it is, the mechanism is elegant in its simplicity.
 
I suspect it is what you get used to using - many of us grew up with common (North American ?) idea that you push safety forward to fire - when needing a shot in a rush, I do not know of anyone that reads the words scribed, or looks at the colours - will be by feel and by muscle memory. Many CZ rifles were made that way - pull the safety lever "back" to fire - push it forward to be "on safe" - as Phil Shoemaker wrote - "someone is going to get killed over that, one day". Especially if you regularly use various types / brands of long guns. Is likely NOT an issue, if you only have that type on all your guns.
 
Yes the safety is backwards, and to make some type of linkage to reverse it would be well above my skill level. I'm just learning as i go, lots of my first time doing something happened on this rifle.

as i said earlier ill have to think of it as, its now "safe" to start blasting stuff.

but it wouldn't be that hard to make a whole new tang and have it engraved opposite so it says "safe" when its safe. I'm going to let it go for now, i may do that before i send it for CCH though.

Tiriaq, that's pretty much what I'm thinking

I'm sure ill get use to it but it really is mainly for looks, all Lee Enfield's have a very effective half #### safety if i wanted to use something that isn't "backwards" while hunting


the safety now clicks into safe position and clicks in the off position, when making the new push rod bent up a little tip on the end and then filed 2 little groves into the bottom of the tang. its a bit frictiony because the lip is so short it cant act as a spring.

my SXS shotgun and SXS 45-70 are the only rifles i have with these types of safeties. between all my rifles there is a ton of different safeties, on the right side, on the left side, wing on the back of the bolt, tang safety, half #### safety, my sks has a trigger block for its safety.
 
  • Like
Reactions: DGY
I now have 100 brass, dies, and 3 different types of bullets (that i want to test). I have two different types of powder for it as well so it will be hard to narrow it down

so I'm looking for a range in the lower mainland that i go go and sit at for an afternoon and test out the rifle shooting over my crony. i don't mind paying a fee or something like that

is the best way to find the load for this rifle something like below?

(these numbers are almost arbitrary (they are based off the max pressure of the round not the action (41kpsi) I'm going to get a friend with quickload to run the all the numbers for me to stay below 49k psi pressure (303 British's max pressure))

5x 129gr with 32gr of imr3031
5x 129gr with 34gr of imr3031
5x 129gr with 36gr of imr3031 max load

5x 129gr with 33gr of H4895
5x 129gr with 35gr of H4895
5x 129gr with 37gr of H4895 max load

the the same with with the 140gr's and the 160gr's

and pick the velocity/groups i like the best. or should i do groups of 3's and have 2 different OAL to test for each bullet weight and powder
 
I keep creeping this post hoping for some more updates. Just saying.


Well you are going to be in luck soon. I just spend a few days last week cleaning and setting up my shop. So it's slow at work and I have lots of free time. I'm really excited to have my shop setup and organized, my shop has been out of boxes of stuff for the last 3.5 years and finally I have every box of stuff sorted and put in it's place. I. Have an unbelievable amount more tooling for my lathe and mill then I had thought.

I already built a sweat box for the rust blueing and will be working on this rifle with in a few days.

The last few days I've been finishing up some other projects that were closer to finished than this rifle. Ill be posting pics of my now finished 22 short SxS rifle in its thread. I also finished my 43 express mause and its ready for load development and sight in.
Right in time for Christmas!! How thoughtful
 
Back
Top Bottom