If you use LE Wilson dies and an arbor press and are interested in seating pressure this project may be of interest.
I will not get into the benefits of measuring bullet seating pressure etc. as this can be found on the 21 Century web site as well as others.
The 21 Century hydraulic press for measuring bullet seating pressure is nice but there has to be a more economical solution , than $375+ US.
$75 is the entry point for this project and all parts are available at your favourite Princess Auto.
This is what worked for me ,but I’m sure others will have innovative ways of achieving similar or better results.
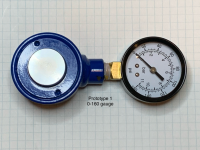
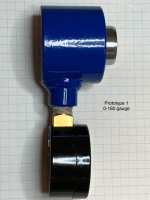
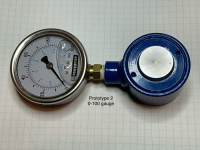
The load cell cylinder assembly is a 4 Ton Low profile Porta-Power ram, Powerfist brand
It was selected for the following reasons.
There is no return spring in the piston assembly.
Low profile , < 2 inches , suits most arbor presses used by reloaders.
Readily available, locally for $55
Pressure gauges.
The first prototype used is a 0-160 psi 2 inch dial , dry gauge. $14
Second prototype used a 0-100 psi 2 1/2 inch dial , glycerin fill, $20
The larger diameter, and lower range gives very good resolution and is the preferred gauge. The Glycerin fill should be better for the cycling action of the device and is what 21C uses.
The Glycerin fill is not 100% of the available case volume so you end up with a bubble in the dial face. If the bubble is a concern , removing some fluid , so it is not visible when the gauge is horizontal , seems to be a better option than adding glycerin .
21C recommends a variety of pressure gauge ranges depending on your application, and it is something to consider before selecting a gauge.
The larger dial face makes readings easier.
Hydraulic fluid is Canola oil ,100% Canadian , readily available, food safe, easy to clean up, etc. But some might prefer virgin olive oil…
Tools / materials
17mm socket or wrench to remove the hydraulic fitting.
Adjustable wrench etc. to install the pressure gauge
Hammer , dead-blow preferred
Thread tape.
Syringe or similar device to inject the canola oil. The cylinder port is restricted, and can get air locked if you don’t use a syringe.
Your preferred cooking oil / hydraulic fluid
Procedure:
1 Remove hydraulic fitting
2 Remove /Shake out the factory hydraulic fluid.
3 Extend the piston , by supporting the cylinder with the piston down and unsupported. Strike the cylinder back , and inertia will cause the piston to come out . About 1/2 inch is maximum extension but 1/4 + is adequate.
With the threaded connection in the 12 o’clock position for steps 4,5,6
4 Using a syringe, inject Canola oil into the cylinder. Bubbles are a good sign you are displacing the air.
Fill to overflowing.
5 Slightly compress the piston for a final , air purge . #1
6 Install the pressure gauge . Don’t worry about spillage or compressing the fluid , as the piston will move to a neutral position.
Once the gauge is installed the unit can be moved from the vertical 12 o’clock position.
#1 you can fine tune the piston extension to bottom out approximately at an predetermined pressure. About 0.085 inch equates to 100 psi .
A C clamp and appropriate spacer can be used to compress the piston before installing the pressure gauge.
You can do it by hand but a C clamp gives better control for the compression . Back off the C clamp before installing the gauge.
7 Have fun….


