Model 1917 build

Ok, I think I understand what you’re saying. I find that maybe I kind of “palm” the bolt knob rather than use the tip of a finger or something so with understanding that rationality I feel my preference is c on close, but appreciate you taking a minute to elaborate
The other thing that I didnt mention is that it just :modernizes the action...pretty much every bolt designed or built after the first war is #### on opening so somebody must think its the way to go LOL.
Except the firing pin is not fully cocked with a "####-on-open" Mauser 98 - you finish the cocking as you close the bolt on the forward stroke - by pushing forward. "####-on-open" gets you like 95% of the way to cocked - not all the way there. Many British (?) shooters preferred the #### on close system - might actually be about what one gets used to.
Not so with the Enfield P models, speed conversions are fully cocked and ready to go...There must be a version of same for Mausers as well both my old man and brother had war years actions converted to sporter's that were very much fully cocked on opening. One was done by Parker Hale and the other was an Argentine Mauser that was "kitchen table" done by a friend of the old man's.
 
When you open the bolt on one of those conversions - often there is a cam that brings back the firing pin from the "fired" position - so the bolt body is holding the firing pin back, on a conversion - "cocked on close" types do not much with the firing pin. As you slide the bolt forward, that "firing pin hold" is transferred to the trigger sear - the bolt body moves forward slightly so that it is the trigger sear, not the bolt body, that is holding the firing pin back - that might be occurring as the bolt handle is dropped downwards - hence, the very last part of the "cocking" action - the last few percent of main spring compression - occurs when it becomes the trigger sear holding back the firing pin, is done on the forward motion of the bolt body. There are several P14, M1917 and Mauser 98 actions here - most do not have barrels on them - they mostly all work the same for the final step of "cocking" the firing pin. As do M93 Mausers, M96 Swede, etc.
 
Last edited:
Does anyone have some cool ideas for crossbolts? Looking to do something unique, or maybe just cap with walnut.

Was thinking it would be cool to do something like a crescent moon on one side, and like a gold titanium head on the other side. Have wanted to do silver inlay for a while too so could figure out a pattern, get it burnt in with laser, and the hammer some silver wire in. I like some of the patterns where the engraving, or inlet steel or silver wraps around the two crossbolts
 
Some years ago, I owned a push feed Model 70 Winchester in 375H&H - it was done up with engraving on the heads of the two cross bolts - each end of the magazine mortice - I though that looked good - another CGN member has that rifle now. I never tried to do an "inlay" as you describe - no reason that should not work - an FYI - some posters had said some "cross bolts" were simply "plastic" dots on the wood - nothing inside between the "dot covers".
 
In a way the conventional modern design; the “interface of walnut to steel” isn’t really the best approach to strength under recoil.

Action stiffness sort of utilizes the wood around it. Does the front recoil really take recoil? The thin side rails of lumber and the steel action then transfer that force to the back of the action, and then to the back of the stock against your shoulder. I can see why an aluminum bedding block was the next step with fiberglass shell for UK designed long range rifles.

As for black plastic dots that don’t cover a crossbolt… it’s like putting a Lexus sticker on your Honda.
 
Last edited:
micro update:

Stock now has wrist reinforcement pin epoxied in. Used threaded rod that was just under 3/8” I had kicking around.

Gonna start on inletting for sling mounts next and the cross bolts. Thinking I’ll glue in walnut to make them hidden. Have titanium bolts and pipe from previous project. The sling mounts I had cut for the 9.3x57 husqy project a couple years ago. I don’t think I’m gonna do a metal palm cap. Debating still but think I’ll go with ebony this time.
 

Attachments

  • IMG_6524.jpeg
    IMG_6524.jpeg
    104.8 KB · Views: 41
  • IMG_6516.jpeg
    IMG_6516.jpeg
    93.7 KB · Views: 41
Did something that seems a bit “new” for the ebony front. I’d guess someone else has done this before haven’t found pictures. Basically just radius’d around the front sling mount and cut a recess in the ebony then epoxied and sanded. Plan to stain the ebony black(er)

Epoxied the palm swell ebony chunk and filling some holes in the stock. I had a piece of walnut blow out at the front of the Magwell cutout that I’ll need some repair work on.

I think I’ll still do a barrel band sling mount (similar to Ruger Alaskans ) and then a NECG rear site.

Next will be making plugs and epoxy in place over cross bolts.

Also pondering making lower scope rings from aluminum (order from a CAD file from sendcutsend . com) and then use my lapping bar to keep chunks aligned, then grind them down to where a scope just clears the rear sites. Would like to do this so I can dial in ring placement for scope/relief, and maybe put a lip at the rear edge to the action to put recoil on rings more and base screws less.
If I make ring bases wide then I could do a third screw on rear base.
 

Attachments

  • IMG_6658.jpeg
    IMG_6658.jpeg
    101.8 KB · Views: 29
  • IMG_6659.jpeg
    IMG_6659.jpeg
    136.6 KB · Views: 29
  • IMG_6660.jpeg
    IMG_6660.jpeg
    133.1 KB · Views: 29
IMG_6669.jpeg
Shape is about done, got the sling mounts shaped to the profile, though there is a bit of a pit where I welded the studs in on the front sling mounts, so I might dremel out and reweld so it’s a bit cleaner. I put a coat of linseed on it yesterday evening to help protect the walnut from staining.

Going out to the garage to do the cross bolt plugs shortly, and the. Will fill the “wormhole” holes on the butt stick with the same black epoxy. The stock is getting close to done but I do want to get something lasered into the lumber for grip at the fore end. Kinda wish checkering cutters were cheap and widely available.

Oh yeah. I also welded a bit on the bottom metal to allow conventional Allen head (recessed socket cap) screws to be used. This was threaded to 1/4-28 so I just ordered stainless but might powder coat black.
 

Attachments

  • IMG_6665.jpeg
    IMG_6665.jpeg
    102.3 KB · Views: 25
  • IMG_6663.jpeg
    IMG_6663.jpeg
    88.8 KB · Views: 22
  • IMG_6671.jpeg
    IMG_6671.jpeg
    90 KB · Views: 23
  • IMG_6679.jpeg
    IMG_6679.jpeg
    120.3 KB · Views: 19
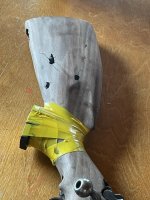
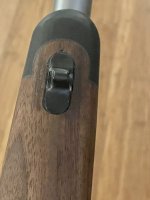
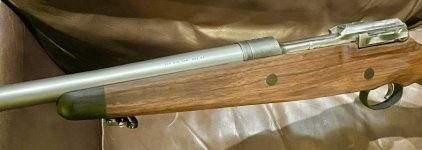
The old barrel was junk. The new one is a gain twist chambered in 458 Win Mag. You can see the size of it in contrast to the dime in the one photo

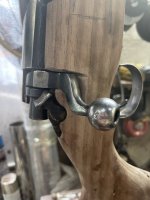
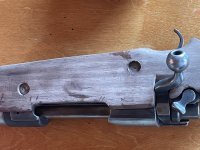
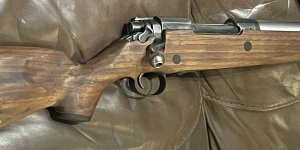
Steel work is almost done, I still need to do rear folding leaf or something.

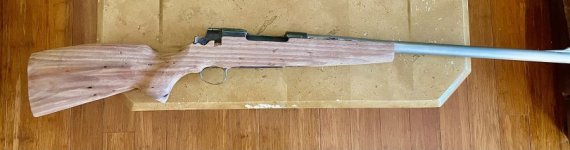
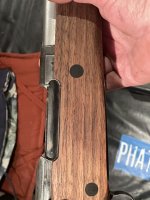
The action is a model 1917, brother to the Pattern 14 aka P-14 but probably swapped to the P-14 bolt for sizing.

Undecided about the dog leg, I actually kind of like it. I am considering modifying the bottom metal to hinged with button release and over sizing the trigger guard slightly for gloves.

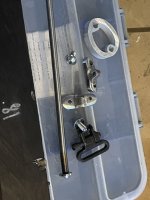
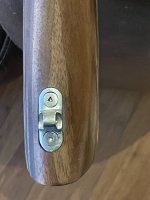
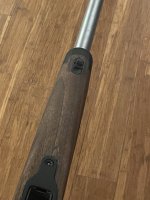
Edit, this is what I’m planning to use for sling mounts. I’m showing the 9.3x57 stock I did with them. I just screw them from the inside and then grind/sand the screw flat where it protrudes on the bottom. Debating about using this for palm swell cap or making a different style
Ive got a p 14 in 458 win mag.
 
Oh yeah? How’s it run? Any issues or comments on the caliber/action combo? Pictures? Would like to see it
I had one in 458. Rechambered it to 450 Ackley. Feeding was an issue, but got that sorted. The sporter stock I had on it originally cracked, so I'm going to have to find something stronger and put a couple reinforcing bolts in it this time. - dan
 
  • Like
Reactions: DGY
Wormholes in the wrist??
There’s a little bit at or near the wrist, and some further back on the butt stock, I don’t believe enough to be an issue, plus I’ve got a threaded rod epoxied through the wrist to reinforce.
I had one in 458. Rechambered it to 450 Ackley. Feeding was an issue, but got that sorted. The sporter stock I had on it originally cracked, so I'm going to have to find something stronger and put a couple reinforcing bolts in it this time. - dan
Nice Dan!
I contemplated buying a Boyd’s, probably cheaper by a long stretch when you consider hours into it, but it’s more fun as a project.

I put a Boyd’s on a P-14 (303) in the camo Color and it looked awesome. I sold it and it went quick, but I almost went that route again other than I wanted a traditional walnut/ebony safari style for a build.
 
I had one in 458. Rechambered it to 450 Ackley. Feeding was an issue, but got that sorted. The sporter stock I had on it originally cracked, so I'm going to have to find something stronger and put a couple reinforcing bolts in it this time. - dan
Can you not fix that stock? I fixed lots of stocks over the years and some broken in half.
 
A couple updated pics. Need to powder coat a screw, but I’ll be putting this thread on hold for a bit until I get some lasering done or get started on scope and rear site
 

Attachments

  • IMG_6735.jpeg
    IMG_6735.jpeg
    90.7 KB · Views: 20
  • IMG_6734.jpeg
    IMG_6734.jpeg
    97.4 KB · Views: 20
  • IMG_6733.jpeg
    IMG_6733.jpeg
    58.2 KB · Views: 20
  • IMG_6728.jpeg
    IMG_6728.jpeg
    73.7 KB · Views: 20
  • IMG_6729.jpeg
    IMG_6729.jpeg
    57.8 KB · Views: 20
Who are you getting to do the laser checkering?

Nice work so far!
I have a buddy (Larry @ solo laser craft) that does most of my stuff, but I don’t have access to CAD right now to do design for him, and found another guy on FB marketplace that has posted some really good looking work that I might get him to this instead.

Been thinking about getting some artwork, it would be fun to do a bison on one side inset in the checkering and a water buffalo lasered on the other side, for sort of a “north-American/ African” safari theme.

Also was looking at getting border groove big enough to hammer silver inlay but that’s maybe a bit too much. I really do like the look of silver inlay detail around sling mounts and stuff and would like to play with that, and maybe worth buying some silver ribbon wire to try my hand at it. We’ll see..
 
Last edited:
Back
Top Bottom