


You are using an out of date browser. It may not display this or other websites correctly.
You should upgrade or use an alternative browser.
You should upgrade or use an alternative browser.
Ross Long Range Target Rifle Project - Pic Heavy
- Thread starter Sharps45-70
- Start date


Some random thoughts...
A M-10 (.280) stock is profiled for a rather light sporting barrel. There are M-10 rifles out there with poor bores, cut barrels, extra holes, etc. What you want is a M-10 trigger guard and magazine assembly. A service Mk.III receiver would work just fine. A messed up MK.II** might be an option, depending on the cartridge you choose.
A Mk.III rear sight bridge can be flattened and used as a sight base. Or used to mount the Ross sight of your choice. Sell the service sight.
"R" versions of classic cartridges should work with a .303 bolt. 6.5x57R, 7x57R, 7x65R etc.
From the Enfield rifled musket through the MLE and on to the Ross, the rear sight bases accept all the sight leaves of the period. That is why there are MLEs with Ross rear sights. A Mk.II sight like a Sutherland or Pilblad, etc. could be used. A BSA Martin would work.
View attachment 364423
A barrel with the Light Palma contour would work. These are available with the length. Shank diameter is one thing, shoulder diameter is also a consideration.
Not sure about the 6.5x57r and 7x65r, but I've been having troubles finding 7x57r. I managed to get a few boxes and buying the dies to reload...
Quick update
I just dropped off the relevant pieces at KS Arms. They were hesitant about actually putting together the rifle for me, but they had no problem with making a barrel. He said he would have to think about it a bit since the Ross is such a PITA to install with all the cuts needed in the breech so it needs extra time dedicated to it. We'll see how it plays out - worst case, I have to send it to another smith who has already said he can make the cuts.
Either way, the barrel is as follows:
Chromoly steel
.264", 1-8" twist, to be chambered 6.5/303 if they decide to do the build
Light Palma contour, 30" finished length
More to come as it happens")
I just dropped off the relevant pieces at KS Arms. They were hesitant about actually putting together the rifle for me, but they had no problem with making a barrel. He said he would have to think about it a bit since the Ross is such a PITA to install with all the cuts needed in the breech so it needs extra time dedicated to it. We'll see how it plays out - worst case, I have to send it to another smith who has already said he can make the cuts.
Either way, the barrel is as follows:
Chromoly steel
.264", 1-8" twist, to be chambered 6.5/303 if they decide to do the build
Light Palma contour, 30" finished length
More to come as it happens
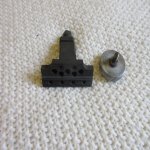
The new (to me) rear sight just arrived in the mail. It is a BSA pre-Martin design (pat.21926/07). It is a very cool sight which uses a worm gear to drive two parallel elevation screws. Since the threads are VERY fine, the slider has two quick release latches which are squeezed so the sight can be moved quickly. I am missing one screw and one latch. While it is in nice shape and should be a good user, it needs a good clean and some parts made. I also acquired a military style rear bridge (thanks Oldguncrank!) which has the sight mount and spring built in, whereas I would have to make a base if I used the standard commercial bridge.
Need to do on the sight:
Clean
Make a new quick release latch
Find two screws (I think I know a guy)
Note on the left the military bridge vs the commercial bridge on the right.


More to come as I make the necessary parts for the sight. Stay tuned
Need to do on the sight:
Clean
Make a new quick release latch
Find two screws (I think I know a guy)
Note on the left the military bridge vs the commercial bridge on the right.
More to come as I make the necessary parts for the sight. Stay tuned
Got some work done on the project the last few days in isolation, moatly on the rear sight and mount.
I did pick out a stock blank to use, have a look below I liked the mineral lines and colour of this particular one.


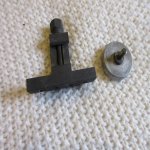
I started my work on the sight base. As noted before, this was a military bridge, so it had a charger guide that was cut off at some point in its past. It was pretty well done, but has some rough cut lines, so I cleaned those up. This part will be reblued when the time comes. I just used a mill file to clean it up, then wrapped the file in some wet dry sandpaper to polish the surface up to 600 grit. One of the things to be sure to do if you ever do this is to ensure you file the excess metal to the cove shape the side of the bridge has. I used a dowel wrapped in wet dry for this part.


Next is the sight itself. I decided to do a mechanical rebuild and leave the finish alone since it is in pretty good shape. I am only doing what needs to be done to bring it back to usable condition. I may add an eyecup at a later date as the hole is abysmally tiny, but I have to make sure it will clear the bolt first so I can find something the right diameter.
Got the sight broken down. I should have two of both of those screws and another one of those latch parts with a spring:

I have to make another one of these parts. It has an open ended threaded section that the spring pushes against a screw to allow the slider to move up and down. I decided instead of making the new one for a V spring, I would design it for a small coil.

The thread needed was a 0.5 pitch, so I found I had a 3mm-0.5 tap on hand that would work. It's not exact, but for the short mating surface it works very well.


I used an old moulding plane iron that is quite soft, and is about 20 thou thicker than needed for the part

I used some sharpie to trace out the rough shape of the part

I want to do as much machine work as possible while it is still a large piece of metal. It makes it easier to clamp and work with. Here you see me marking the location of the pivot hole with a punch. You can also see the punch mark I made on the end where I would drill and tap for the threaded portion. In hindsight, the saw cut you see I would have made after. I made this so I could remove chips more easily when tapping and see my depth, though this wasn't needed.


Tapping the hole:

Next I must apologize, I didn't take any pictures of shaping the part with the file. This stage was just filing to shape, rounding edges to match the original, and drilling a small hole in the back to accept the coil spring. I also trimmed the replacement bolts and cold blued all the parts to match the finish of the sight.

Last is an assembled and greased BSA pre-Martin target sight Function is a little tight in places so that needs to be addressed, but I should be able to get it working flawlessly soon.

In other news, my stock ***should*** be on the duplicator this week, and the barrel blank also ****should**** be done this week. Once the stock arrives I can get working on final shaping and contouring, as well as some detail work before the action arrives for inletting.
Talk soon!
I did pick out a stock blank to use, have a look below
I liked the mineral lines and colour of this particular one.
I started my work on the sight base. As noted before, this was a military bridge, so it had a charger guide that was cut off at some point in its past. It was pretty well done, but has some rough cut lines, so I cleaned those up. This part will be reblued when the time comes. I just used a mill file to clean it up, then wrapped the file in some wet dry sandpaper to polish the surface up to 600 grit. One of the things to be sure to do if you ever do this is to ensure you file the excess metal to the cove shape the side of the bridge has. I used a dowel wrapped in wet dry for this part.
Next is the sight itself. I decided to do a mechanical rebuild and leave the finish alone since it is in pretty good shape. I am only doing what needs to be done to bring it back to usable condition. I may add an eyecup at a later date as the hole is abysmally tiny, but I have to make sure it will clear the bolt first so I can find something the right diameter.
Got the sight broken down. I should have two of both of those screws and another one of those latch parts with a spring:
I have to make another one of these parts. It has an open ended threaded section that the spring pushes against a screw to allow the slider to move up and down. I decided instead of making the new one for a V spring, I would design it for a small coil.
The thread needed was a 0.5 pitch, so I found I had a 3mm-0.5 tap on hand that would work. It's not exact, but for the short mating surface it works very well.
I used an old moulding plane iron that is quite soft, and is about 20 thou thicker than needed for the part
I used some sharpie to trace out the rough shape of the part
I want to do as much machine work as possible while it is still a large piece of metal. It makes it easier to clamp and work with. Here you see me marking the location of the pivot hole with a punch. You can also see the punch mark I made on the end where I would drill and tap for the threaded portion. In hindsight, the saw cut you see I would have made after. I made this so I could remove chips more easily when tapping and see my depth, though this wasn't needed.
Tapping the hole:
Next I must apologize, I didn't take any pictures of shaping the part with the file. This stage was just filing to shape, rounding edges to match the original, and drilling a small hole in the back to accept the coil spring. I also trimmed the replacement bolts and cold blued all the parts to match the finish of the sight.
Last is an assembled and greased BSA pre-Martin target sight
Function is a little tight in places so that needs to be addressed, but I should be able to get it working flawlessly soon.
In other news, my stock ***should*** be on the duplicator this week, and the barrel blank also ****should**** be done this week. Once the stock arrives I can get working on final shaping and contouring, as well as some detail work before the action arrives for inletting.
Talk soon!
Send me a PM and we can figure it out. I have an extra here that may work.That top stock is nice, fits m1910? Where would a guy get something like that? I have a m1910 that wax sporterized but lost the stock in a house fire.
Brutus
CGN Ultra frequent flyer
The Soviets made up competition rifles in 7.62x54R based on MK.III rifles.
And I do believe they also got around to a few in 6.5 with the rim as well.
It's raining pretty hard outside, so I figured I would make an update post
The gunsmithing work is done! I am going tomorrow morning to pick it up. I'll have it for a few days while I do the inletting work, then I am sending it off to some folks to have it blued (hopefully rust blued) and some small parts colour case/nitre blued. Here is a picture of it at the smith last Thursday sans front dovetail. I will be also ordering a front target globe sight once I have it here so I can measure for sight height.

My work lately has revolved around the stock. I received it in the mail a few days ago and have been working on the leather covered pad and getting done what I could to the stock without the barreled action. Here is a picture of the three stocks together. The top is the original M10 stock, the centre is the stock someone made at some point which is the one I sent to the duplicator, and the bottom is the new stock with wider forend. Excuse the messy bench, a few projects on the go


I am very happy with the quality of work that was done. Bill Landals with Alberta Gunstocks is your man, and he does lots of milsurp stocks as well. Excellent service.
I attached the recoil pad and went to work sanding it down to size. It was pretty easy, though it is very important you have a flat mating surface for the pad. The original stock had a plate which is slightly concave in nature. It was a little time consuming getting it as flat as possible but the rest of the shaping went off without a hitch! I then did some light blending to remove some of the belt sander marks. I also took this time to finish contouring the comb flutes.


Once that was done, it was time to get the recoil pad prepped for leather. I followed Larry Potterfield's Youtube tutorial for this, so if you are interested, that is where to look. I used a forstner bit and some oil, and slowly I drilled out 1/2" holes in the pad to accept the 1/2" soft plugs I will use later.

I then cut out a sufficiently sized section of leather to cover the pad. It is important to use either pig skin or goat skin leather since it is very stretchy and quite thin. I used pig skin for mine, which is dyed brown. I wet the leather with warm water and stretched it over the pad, nailing it as I go. I then used elastics to pull it under the pad when done. This currently drying overnight and will shrink to form the shape of the pad. When wet, it appears much more porous compared to when it is dry, so tomorrow it should look smoother than in this picture. It will also smooth out when I apply finish to it.

Next is the grip cap. I decided on this rifle to not go crazy with the forend tip and grip cap, so I elected for a simple round Ebony forend tip and a simple flat Ebony grip cap. I don't have Ebony, so I used some African Blackwood I have here, which is almost identical. I didn't want to have a screw showing for this, so I used two brass picture hanging nails, cut them in half, and drilled alignment holes in the cap and grip. This is to help with strength and preventing the cap from moving when being glued and clamped. I will then cut off the excess and file to size. I am thinking a 1/8" thickness would be nice but I may decide otherwise when shaping.

That's it for now, more updates to come in the next few days
The gunsmithing work is done! I am going tomorrow morning to pick it up. I'll have it for a few days while I do the inletting work, then I am sending it off to some folks to have it blued (hopefully rust blued) and some small parts colour case/nitre blued. Here is a picture of it at the smith last Thursday sans front dovetail. I will be also ordering a front target globe sight once I have it here so I can measure for sight height.
My work lately has revolved around the stock. I received it in the mail a few days ago and have been working on the leather covered pad and getting done what I could to the stock without the barreled action. Here is a picture of the three stocks together. The top is the original M10 stock, the centre is the stock someone made at some point which is the one I sent to the duplicator, and the bottom is the new stock with wider forend. Excuse the messy bench, a few projects on the go
I am very happy with the quality of work that was done. Bill Landals with Alberta Gunstocks is your man, and he does lots of milsurp stocks as well. Excellent service.
I attached the recoil pad and went to work sanding it down to size. It was pretty easy, though it is very important you have a flat mating surface for the pad. The original stock had a plate which is slightly concave in nature. It was a little time consuming getting it as flat as possible but the rest of the shaping went off without a hitch! I then did some light blending to remove some of the belt sander marks. I also took this time to finish contouring the comb flutes.
Once that was done, it was time to get the recoil pad prepped for leather. I followed Larry Potterfield's Youtube tutorial for this, so if you are interested, that is where to look. I used a forstner bit and some oil, and slowly I drilled out 1/2" holes in the pad to accept the 1/2" soft plugs I will use later.
I then cut out a sufficiently sized section of leather to cover the pad. It is important to use either pig skin or goat skin leather since it is very stretchy and quite thin. I used pig skin for mine, which is dyed brown. I wet the leather with warm water and stretched it over the pad, nailing it as I go. I then used elastics to pull it under the pad when done. This currently drying overnight and will shrink to form the shape of the pad. When wet, it appears much more porous compared to when it is dry, so tomorrow it should look smoother than in this picture. It will also smooth out when I apply finish to it.
Next is the grip cap. I decided on this rifle to not go crazy with the forend tip and grip cap, so I elected for a simple round Ebony forend tip and a simple flat Ebony grip cap. I don't have Ebony, so I used some African Blackwood I have here, which is almost identical. I didn't want to have a screw showing for this, so I used two brass picture hanging nails, cut them in half, and drilled alignment holes in the cap and grip. This is to help with strength and preventing the cap from moving when being glued and clamped. I will then cut off the excess and file to size. I am thinking a 1/8" thickness would be nice but I may decide otherwise when shaping.
That's it for now, more updates to come in the next few days
Dark Alley Dan
CGN Ultra frequent flyer
- Location
- Darkest Edmonton
Lovely work, mate. Please keep us posted.
Thanks for the kind words! It definitely is rewarding once things start to look like something resembling a rifle
Update time! But first, I want to provide you all with a few more pictures of the barrel. Very nice workmanship from KS Arms and really good to deal with. I made sure to get the original serial number engraved in the barrel so people in the future could keep track of which Ross this originated as. Also decided on a recessed target crown instead of a flat muzzle since I have been known to bump things from time to time. Fitted with a standard 3/8" dovetail.


Here is the barreled action with the sight fitted so I could measure sight height for ordering a front target globe. With the ladder up on the bridge, a tall front sight is needed. I went with the Lyman 17A with spirit level with a 3/4" height. Coming in the mail soon

I also thought it would be good to show a close up of the Ross barrel threads since I had some people ask to see the profile in more detail. I now have a 280 Ross sporter barrel if anyone wants one

Alright so back to work...
The leather pad looks good so far. It is dried out now, and you can see it appears much smoother now that it's dry. I removed it from the fixture and used contact cement to secure it to the pad. I punched two holes in the top for the screws which will be plugged later with leather plugs. Then I cut off the excess, cutting triangles along the bottom edge and folding it under. It is secured under with contact cement and some epoxy, and was dried while clamped to a flap surface to ensure a flat contact to the stock. I may need to touch up some of the epoxy with a file since it leaked from one edge It was a little messier than I would have liked, so I am hoping it cleans up and doesn't ruin the leather. I can also possibly use some 2000 grit wet/dry to polish it out, but I'll have to wait and see.


Then I got to work shaping the African Blackwood grip cap. I also took this time to get the toe line right and get the flutes in the grip there I wanted them. More smoothing later on. The grip is 5/32" thick, which looks right to my eye.


I also got the bottom metal inlet today. I probably will have to do some more tweaking once I get the magazine in place, but for now, it's done. The picture shows when the metal was still proud of the wood, but I inlet it more so the wood was proud to the metal, I just didn't grab another picture (whoops).


Here is a quick picture I took with the barreled action on top of the stock. I just wanted to see proportionally how long the forend should be before I chopped the tip off for the new African Blackwood tip. Thought you would enjoy the picture.

In other news, I also sent the first batch of parts off to be refinished! I sent them off to Oskar Kob who comes highly recommended to me. The bolt body and trigger blade will be colour case hardened. The action screws, bolt stop, extractor, and some little parts and screws will be nitre blued. The second set of parts including the barreled action, floorplate, bottom metal, and bridge will be sent for rust bluing later once inlet work is done.
Thanks for reading, and see you on the range!
Update time! But first, I want to provide you all with a few more pictures of the barrel. Very nice workmanship from KS Arms and really good to deal with. I made sure to get the original serial number engraved in the barrel so people in the future could keep track of which Ross this originated as. Also decided on a recessed target crown instead of a flat muzzle since I have been known to bump things from time to time. Fitted with a standard 3/8" dovetail.
Here is the barreled action with the sight fitted so I could measure sight height for ordering a front target globe. With the ladder up on the bridge, a tall front sight is needed. I went with the Lyman 17A with spirit level with a 3/4" height. Coming in the mail soon
I also thought it would be good to show a close up of the Ross barrel threads since I had some people ask to see the profile in more detail. I now have a 280 Ross sporter barrel if anyone wants one
Alright so back to work...
The leather pad looks good so far. It is dried out now, and you can see it appears much smoother now that it's dry. I removed it from the fixture and used contact cement to secure it to the pad. I punched two holes in the top for the screws which will be plugged later with leather plugs. Then I cut off the excess, cutting triangles along the bottom edge and folding it under. It is secured under with contact cement and some epoxy, and was dried while clamped to a flap surface to ensure a flat contact to the stock. I may need to touch up some of the epoxy with a file since it leaked from one edge
It was a little messier than I would have liked, so I am hoping it cleans up and doesn't ruin the leather. I can also possibly use some 2000 grit wet/dry to polish it out, but I'll have to wait and see.
Then I got to work shaping the African Blackwood grip cap. I also took this time to get the toe line right and get the flutes in the grip there I wanted them. More smoothing later on. The grip is 5/32" thick, which looks right to my eye.
I also got the bottom metal inlet today. I probably will have to do some more tweaking once I get the magazine in place, but for now, it's done. The picture shows when the metal was still proud of the wood, but I inlet it more so the wood was proud to the metal, I just didn't grab another picture (whoops).
Here is a quick picture I took with the barreled action on top of the stock. I just wanted to see proportionally how long the forend should be before I chopped the tip off for the new African Blackwood tip. Thought you would enjoy the picture.
In other news, I also sent the first batch of parts off to be refinished! I sent them off to Oskar Kob who comes highly recommended to me. The bolt body and trigger blade will be colour case hardened. The action screws, bolt stop, extractor, and some little parts and screws will be nitre blued. The second set of parts including the barreled action, floorplate, bottom metal, and bridge will be sent for rust bluing later once inlet work is done.
Thanks for reading, and see you on the range!
Nice project! Is the 6.5/.303 a necked down .303, or are you making is with the .303 Epps shoulder?
I am using a necked down 303 with a 6.5x55 shoulder. I will use a 6.5x55 die to neck down the 303 case, and I think that shoulder should perform well.
Blastattack
CGN Ultra frequent flyer
- Location
- Winnipeg MB
Helluva nice looking gun man.


