The Cooey Make-Over Thread

Here is the before of the latest project

rViJf3Q.jpg

SnV3G4F.jpg


And here is the after:

L4eCrF3.jpg

x8f8nGj.jpg

Very nice! How did you refinish the metal?
 
Decided to make a no drill scope mount. Using the screw hole for the rear leaf sight and the rear peep. It's okay for what it is.. Wish the receiver was grooved.

60416203_344314553104082_3989645574235226112_n.jpg


60659168_2316775441911811_3867388058844266496_n.jpg


Say under 1/2" minus the flyer at 25M with bulk ammo.

60386104_349719049231442_2249613185705312256_n.jpg
 
There's enough of the old Cooey .22's out there likely there are lots that have received a "make-over" or "re-do'. So, post your pics/stories here.

Rimfire Mods please feel free to make this a sticky.... ;) :cool:

Here's mine:

I just picked up a fairly clean, but well used, Winchester/Cooey 600 and stripped the stock for an oil refinish. The metal was pretty good so after some clean-up with fine steel wool & oil I think I will just leave it as is.

Topped her off with a little Simmons 3-9x32mmAO .22 scope:

Old stock finish:

View attachment 174550

View attachment 174552

New stock finish [sling swivel studs also added]:

View attachment 174553

View attachment 174554

View attachment 174555

View attachment 174558

View attachment 174560

I've since had 'er up to the range for a try-out. A few boxes of econo American Eagle 40 gr solids thru 'er. Shoots like a dream. I love my "new to me" Winchester .22..... :cool:

**Image and video linking functions will be enabled after you have contributed more to the forum**

**Image and video linking functions will be enabled after you have contributed more to the forum**
---------
NAA.

Wow that is one great looking transformation
 
Here is the before of the latest project

**Image and video linking functions will be enabled after you have contributed more to the forum**
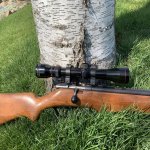

And here is the after:

**Image and video linking functions will be enabled after you have contributed more to the forum**

Like the reddish tingle of the stock - nice job
 
Hi, I have a Ranger .22 / ( model 60 ) with no magazine
I'm looking for a magazine tube follower or at least a good dimensional drawing to copy from .
if any one could help , please let me know
tks
 
Don’t know wether to post here, in general rimfire, or gunsmithing so I’ll try here first. My dad was gifted a neglected model 750 and after some cleanup was able to make it go bang. He does say that it is extremely difficult to ####. So much so that he tied some string around the bolt knob and used a screwdriver as a toggle to pull it back. I’m only going by what he told me as I haven’t seen it yet. My initial searches suggested not to dismantle the bolt if possible so my question to the resident cooey experts is what do you suggest??? Drench in brakeclean, find an ultrasonic cleaner or could there be some broken internals? I look forward to hearing your suggestions.
 
I would see if there is still hung in bolt mechanism. Like you said an ultrasonic cleaner would be good to dislodge old dried out hung from places unseen
 
Update to a recent post, my kids had lost the bolt, I ended up getting a replacement off a member here. The bolt fit pretty good, but the trigger pull was horrendous so I stoned the curved face of the trigger sear on the bolt and it seems to be around 3-4lbs now and passes the bump test when cocked.

The stock was roughed a bit with sand paper, then steel wool (only had 000 fine), then I rubbed 7 thin coats of tru oil by hand into the stock. Steel wooled in between coats lightly as they went on. I also bedded the action from the trigger to 1.5" up the barrel, so now it is free floated, but it does have a lot of flex. If it didn't shoot great I was going to try a pressure point.

The steel I'm less impressed with, the steel wool was too fine I didn't have any sand paper to wet sand the rust spots. I put about 5 coats of BC super blue and rinsed and steel wool between, it looked fantastic that night, but after oiling and letting it sit, the rust spots took an orange tinge under the bluing again.

To mount the scope, I bought some cheap key - mod rails off amazon. I used a ball cutter to round them to the shape of the receiver. The match wasn't perfect, so after tapping 4 #6-32 flat heads I put a light coat of JB weld under them before assembly, but did not clean the oil off the barrel, so I may get them off some day if I want LOL.

A buddy donated the china (unbranded) scope. With federal bulk match it's inside a dime at 50 yards leaning across the hot tub cover.

It was just a keep busy project with materials at hand. The only kick in the teeth: the bolt was missing the extractor so I ordered one from the cooey facebook guy. Just about got it working, bent it one last time and SNAP in 2 pieces. I find the gun is fine to shoot without it, I can nudge the brass out with my fingernail.

IMG_8570.jpg
 

Attachments

  • IMG_8570.jpg
    IMG_8570.jpg
    147.8 KB · Views: 662
Last edited:
Found a Cooey Model 35 Pump

Guy said it was OEM but the stock sure looks different.

0hv5fmv.jpg


Thinking maybe Pine or maybe even Hemlock...certainly not Cooey Walnut.

s5SCIOg.jpg


Field stripping, you could see it was a home made stock.
Top is from a repeater 60 bottom is the stock off the 35.

AzPX3Ma.jpg


Pump handle wood was OEM, that is what I tried to match.

Stripped off whatever was on there, once dried, it looked like the above pics, a very light colour.

Gave it a few coats of Miniwax Special Walnut oil, but it did not soak into the lighter grain .

Gave it three extra coats of Miniwax Ebony Oil.

Closest I could get to match the pump handle wood.

Few coats of BLO and Antique oil 50/50.

This is how it turned out.

3XL7ttT.jpg


lURfGAk.jpg


0jr11dz.jpg


On a scale of 10 for smoothness of pumping....it's about a 1-2....LOL

No wonder old man Cooey gave up on making a pump!!!!

Next project is to find a Winchester 61 pump...heard they're a bit smoother...
 
Last edited:
Anyone know how to disassemble a bolt on a Cooey Model 75? I think the spring in mine is a bit tired as I am getting light strikes and often have to re-#### and try again (and sometimes again) to fire the round. Maybe if I can take it apart one of the machinists at work might have an old box of springs at the back of his toolbox
 
Cooey 75

One of these things is not like the others,
One of these things just doesn't belong,
Can you tell which thing is not like the others
By the time I finish my song?

GJDMFCY.jpg
 
Something that may help folks out in a similar situation.

A friend wanted a single shot 22 for his son for Christmas. I managed to find him a Cooey 39 in nice shape from a buddy at the gun club who had redone the stock when he got it for his kids years ago. Bluing is a bit thin but not bad.

My friend wanted a red dot on it for his son to learn how to shoot, As you know the receiver area is pretty small to do that with (although lots of pics of others that have done so). I mocked up something else and with his ok went through with it. The rear sight is attached by a screw into a drilled and tapped filler plate in the dovetail. The screw has to bottom out on the dovetail to hold it in place.

I determined that a 10-32 screw would fit the filler plate hole. I picked up a package from CTC and then using a file and drill, reshaped the head to fit a Weaver 76 single hole base mount and cut to proper length with a dremel cut off. It has a 8-40 screw so I had to ream the hole out with a #11 drill bit. A dab of cold blue on the screw (although it doesnt look like it in the picture).

The base sits slightly above the barrel, so I roughed up the bottom of the base slightly, and put some JB weld on it and then screwed it into the filler plate so that it would bond to the barrel. Lined up the base and the barrel and let it set up. I wanted to make sure that for a young person he wouldnt knock the base loose. Waited 24 hours, all solid, removed the screw and put some blue lock tight on it and snugged it up..

Put a TruGlo red dot on it (a TRS25 would be sleeker) and its ready to go. Leaves the bolt area open so can see if cocked or not.

AYpMAer.jpg


XtwW761.jpg

Its on straight, just the camera angle

zbDH3Bv.jpg
 
Well that's a bit different, isn't it.
I don't mind new ideas, but if I was "learning how to shoot"
Think I'd stick with the OEM sights first.
Hope you saved the rear notched sight for him too.
 
Anyone know how to disassemble a bolt on a Cooey Model 75? I think the spring in mine is a bit tired as I am getting light strikes and often have to re-#### and try again (and sometimes again) to fire the round. Maybe if I can take it apart one of the machinists at work might have an old box of springs at the back of his toolbox

Still alive? I took apart 2 last week. Can make a video if needed.
 
Back
Top Bottom