


You are using an out of date browser. It may not display this or other websites correctly.
You should upgrade or use an alternative browser.
You should upgrade or use an alternative browser.
What I've been up to...
- Thread starter leelad
- Start date
MarkArma180
CGN Regular
- Location
- Kelowna , B.C.
I love your projects leelad. Keep up the awesome work and updates. You're very talented and I thank you for taking the time to share them with us. Cheers, Mark
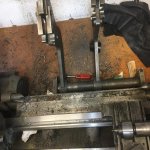
Yesterday was productive! Most of the day was spent making a pair of .30cal cutter boxes.
The hooks I bought from PTG. (At $189US a piece and 5 months lead time; I'm open to alternate suggestions)
I'm not gonna lie, this was a job I'd been dreading... The theory is simple enough(a rod, just under bore diameter, with a slot to accept a cutter hook and a screw actuated ramp to set depth of cut).
But without any samples or drawings or even detailed pictures, there was going to be a lot of guess work in making things actually work.
However PTG wants like $600 a piece for these! My machine is has twin spindles... and I'd like to offer multiple calibers.....
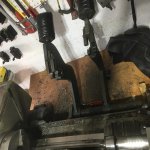
I made them 6" long and wanted the cutter to be in the middle. This meant drilling a hole just over 4" deep to accommodate the spring/plunger.

Next up, mill the slot for the cutting hook. I used a 3/32dia end mill and drove around till the hook juuuuuust fit")

Next I drilled the cross holes after spotting facing with an end mill. (Pins are .045"dia.)

Ramps and plungers! Simple to make, but I spent quite a while playing with angles till I was happy

Plunger...

Next I needed to convert a couple of cap screws to be used as adjusting screws.

I got to use my handy dandy simple dividing head! I always hated trying to index parts on the mill. Standard dividing heads/rotary tables are so big and clumsy, (ours)don't lock up tight, and head clearance ALWAYS seems to be an issue. A couple years ago I said "screw it!" pulled an all nighter on a Saturday, and made this little gem! My boss came in the shop the next morning around 9 and was like "you're here early on a Sunday!"...
He clued in later and asked me Monday morning, "you never left did you??)
But I smile every time I use it!

A threaded collet and jam nut to hold the screw for indexing...

Easy peasy!

Parts ready for assembly.

One more project finished!

The hooks I bought from PTG. (At $189US a piece and 5 months lead time; I'm open to alternate suggestions)
I'm not gonna lie, this was a job I'd been dreading... The theory is simple enough(a rod, just under bore diameter, with a slot to accept a cutter hook and a screw actuated ramp to set depth of cut).
But without any samples or drawings or even detailed pictures, there was going to be a lot of guess work in making things actually work.
However PTG wants like $600 a piece for these! My machine is has twin spindles... and I'd like to offer multiple calibers.....
I made them 6" long and wanted the cutter to be in the middle. This meant drilling a hole just over 4" deep to accommodate the spring/plunger.
Next up, mill the slot for the cutting hook. I used a 3/32dia end mill and drove around till the hook juuuuuust fit
Next I drilled the cross holes after spotting facing with an end mill. (Pins are .045"dia.)
Ramps and plungers! Simple to make, but I spent quite a while playing with angles till I was happy
Plunger...
Next I needed to convert a couple of cap screws to be used as adjusting screws.
I got to use my handy dandy simple dividing head! I always hated trying to index parts on the mill. Standard dividing heads/rotary tables are so big and clumsy, (ours)don't lock up tight, and head clearance ALWAYS seems to be an issue. A couple years ago I said "screw it!" pulled an all nighter on a Saturday, and made this little gem! My boss came in the shop the next morning around 9 and was like "you're here early on a Sunday!"...
He clued in later and asked me Monday morning, "you never left did you??)
But I smile every time I use it!
A threaded collet and jam nut to hold the screw for indexing...
Easy peasy!
Parts ready for assembly.
One more project finished!
These guys might have something worth eyeballing...
https://www.carbideanddiamondtooling.com/RIFLING-CUTTER-BASE-MATERIAL-C2-MICROGRAIN-ID-12957-
https://www.carbideanddiamondtooling.com/RIFLING-CUTTER-BASE-MATERIAL-C2-MICROGRAIN-ID-12957-
Last edited:
fingers284
CGN Ultra frequent flyer
- Location
- Alberta Cowboy Ranges
Not sure if it is available anywhere on the interweb but the Bill Webb homebuilt rifling machine video went to great length to explain & show his trials & errors of making the broach cutters he used. They worked very good after he perfected them. Long time since I watched the video but I remember the two most difficult things to perfect was cutter angle and build them with the rotational clearance to not bind when cutting the turns.
These were made by Bevan back in the mid 90s to remove the vibrations and to hold barrels from warping during turning and contouring
I just finished up a martini and have not done a cleanup yet ( 40 R)the cans on top are 20# weights that make the longer tapers nicer


I just finished up a martini and have not done a cleanup yet ( 40 R)the cans on top are 20# weights that make the longer tapers nicer
Attachments
Last edited:
the cans are for the harmonic dampening 2 x20# stops the wavy effect
I take it both the upper and lower jaws are squeezed in on the barrel being turned? Or just like a box tool steady, adjusted in, and the weight puts the kibosh on harmonics forming?
LeeLad, mind showing a few more pictures of that dividing head of yours? It looks really interesting!
- Location
- WMU248 near Edmonton
wow
I look at these pictures then think to myself that I'm such a hack on the lathe
nice work
I look at these pictures then think to myself that I'm such a hack on the lathe
nice work
Trevj: here are a couple pictures I dug up of that dividing head...
Its pretty straight forward. A body with a spindle hole bored through it, the spindle, a couple indexing plates (24 and 36 hole), a spring loaded indexing pin and a cam locker.
I first built it with just an allen wrench for locking ghe cam. But I quickly opted for a fixed handle.

The indexing plates are secured with a brass bottomed set screw. This way, if I ever want to "split" an indexing hole, I can just lock the spindle, throw a couple pins through appropriate holes, put a digital protractor across the pins. Then offset it to the desired angle, lock it back down and carry on at the new offset.

This was a gear I made for a customer's motor home. (seems whenever I build tooling for myself, shop work shows up that requires it!) ((Hey, the boss doesnt mind giving me material...))

Woodchopper: Thanks for the compliment! Keep in mind however, I have the privilege of using non-hobby grade equipment, and probably have 30,000hrs of shop time...
Its pretty straight forward. A body with a spindle hole bored through it, the spindle, a couple indexing plates (24 and 36 hole), a spring loaded indexing pin and a cam locker.
I first built it with just an allen wrench for locking ghe cam. But I quickly opted for a fixed handle.
The indexing plates are secured with a brass bottomed set screw. This way, if I ever want to "split" an indexing hole, I can just lock the spindle, throw a couple pins through appropriate holes, put a digital protractor across the pins. Then offset it to the desired angle, lock it back down and carry on at the new offset.
This was a gear I made for a customer's motor home. (seems whenever I build tooling for myself, shop work shows up that requires it!) ((Hey, the boss doesnt mind giving me material...))
Woodchopper: Thanks for the compliment! Keep in mind however, I have the privilege of using non-hobby grade equipment, and probably have 30,000hrs of shop time...
Thanks !
Great little project!
If you ever felt the desire to publish stuff like that, I am pretty sure the folks at Village Press would love to print your projects in their magazines (Home Shop Machinist, Home Shop Machinist's Workshop)
I would say, at the prices of those hook cutters, a couple fixtures and some time in front of a surface grinder, or hunting down a small tool and cutter grinder, would be quite justified.
You got some pretty mad skills there! Thanks for sharing your experience!
Great little project!
If you ever felt the desire to publish stuff like that, I am pretty sure the folks at Village Press would love to print your projects in their magazines (Home Shop Machinist, Home Shop Machinist's Workshop)
I would say, at the prices of those hook cutters, a couple fixtures and some time in front of a surface grinder, or hunting down a small tool and cutter grinder, would be quite justified.
You got some pretty mad skills there!
Thanks for sharing your experience!Thanks! I’d like to get into tool making at some point. I think it’s a crying shame no one in Canada makes cutters/reamers etc.
One thing at a time though I guess...
I’m not sure I could handle writing for HSM... That is one magazine that drives me nuts! Seems like they take a simple project and go about it in absolutely the most convoluted way possible! But that’s just me.
One thing at a time though I guess...
I’m not sure I could handle writing for HSM... That is one magazine that drives me nuts! Seems like they take a simple project and go about it in absolutely the most convoluted way possible! But that’s just me.
Thanks! I’d like to get into tool making at some point. I think it’s a crying shame no one in Canada makes cutters/reamers etc.
One thing at a time though I guess...
I’m not sure I could handle writing for HSM... That is one magazine that drives me nuts! Seems like they take a simple project and go about it in absolutely the most convoluted way possible! But that’s just me.
They publish what gets sent to them.
Some of the old time guys like Frank McLean or Phillipe Duclos, had some pretty unique styles.
And since they pay by the page, and seem to be willing to not prune stuff down, I suspect that at least some of their writers are fluffing things up by a fair margin.
Nothing ever says you have to, or that you have to follow the style of the current crop. Just throwing it out there.
Once we get past this Covid foolishness, try to track down the next Western Machine Tool Show (WMTS) in Edmonton. Worth making the trip, to see what is out there, and in particular, to contact some of the small local outfits that are doing tool and cutter grinding. Might get you a place or two worth dealing with for the odd custom tool.
Been a few years since I've been to that show, definitely on my hit list for next round!
Got a bit more done.
I want to automatically adjust the cutter depth by means of a fixture where the machine drives the cutter adjustment screw into a socket and rotates it the required amount.
This "indexing box" needs to be adjustable to allow perfect alignment with said screw but also be able to fold out of the way for loading/unloading as well as in process measuring.
Not rocket science, but a cool little part non-the-less
Here we go, material blocked out, ready to make chips...

Chips made.

Base material blocked out, ready to go!

Rough milling...

Finish milled.

Bit of reaming...

Gotta say, looks vaguely like an M1 Garand receiver... vaguely.

Anyhoo!
Some woodruff cutter action...

Hold down screws step one...

Step two!

three...

And last one done.

Cute lil guys!

Gah, free time is never long enough!! Still got a bit more to do but here they sit.


Got a bit more done.
I want to automatically adjust the cutter depth by means of a fixture where the machine drives the cutter adjustment screw into a socket and rotates it the required amount.
This "indexing box" needs to be adjustable to allow perfect alignment with said screw but also be able to fold out of the way for loading/unloading as well as in process measuring.
Not rocket science, but a cool little part non-the-less
Here we go, material blocked out, ready to make chips...
Chips made.
Base material blocked out, ready to go!
Rough milling...
Finish milled.
Bit of reaming...
Gotta say, looks vaguely like an M1 Garand receiver... vaguely.
Anyhoo!
Some woodruff cutter action...
Hold down screws step one...
Step two!
three...
And last one done.
Cute lil guys!
Gah, free time is never long enough!! Still got a bit more to do but here they sit.

Got these buttoned up on the weekend, Dang this machine is close now! Gotta weld up the drip pan, get my oil pump sorted out and set up stops...
I've got a handful of barrel blanks drilled/reamed ready for test flights!
Last holes in the upright...

This will have two opposing set screws, one to act as the driver for the adjusting screw, the other will act as a jam screw to maintain timing.
The hole is eccentric and the base holes are slotted. This will allow me to align the driver with the adjusting screw very precisely.

Something like this.

Should work slick!

I've got a handful of barrel blanks drilled/reamed ready for test flights!
Last holes in the upright...
This will have two opposing set screws, one to act as the driver for the adjusting screw, the other will act as a jam screw to maintain timing.
The hole is eccentric and the base holes are slotted. This will allow me to align the driver with the adjusting screw very precisely.
Something like this.
Should work slick!
- Location
- WMU248 near Edmonton
so this needs an update


