Derya pump and bolt action 9mm pcc

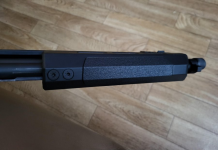
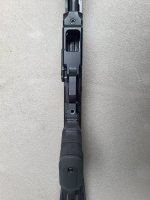
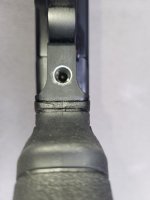
Thanks for posting a picture of the bottom of the foreend,

I can see why they didn't put M-lok's on the bottom for a rail.... they decided to bevel the sides down towards the bottom and thinned it out.
It looks like it's barely wide enough for a rail. It almost looks like it's tapered as well?

I can see some aftermarket fore ends rolling out if these guns run well.

1780628032873.png
 
Thanks for posting a picture of the bottom of the foreend,

I can see why they didn't put M-lok's on the bottom for a rail.... they decided to bevel the sides down towards the bottom and thinned it out.
It looks like it's barely wide enough for a rail. It almost looks like it's tapered as well?

I can see some aftermarket fore ends rolling out if these guns run well.

View attachment 1154901

To the best of my abilities with my retractable tape measure, I measured the width of the bottom flat at 1,3 cm (13 mm).

It feels completely flat, although the stippled part is raised about 1 mm. It almost feel like it's glued or melted onto the foregrip. I tried to pry it off, but it looks & feels like it's one unit.

Indeed, a foregrip with Mlok or picatinny at the bottom would be great. All this rifle needs to kick ass even more is a vertical grip on the pump foregrip. Duke Nukem 3D shotgun style, lol!

.
 
To the best of my abilities with my retractable tape measure, I measured the width of the bottom flat at 1,3 cm (13 mm).

It feels completely flat, although the stippled part is raised about 1 mm. It almost feel like it's glued or melted onto the foregrip. I tried to pry it off, but it looks & feels like it's one unit.

Indeed, a foregrip with Mlok or picatinny at the bottom would be great. All this rifle needs to kick ass even more is a vertical grip on the pump foregrip. Duke Nukem 3D shotgun style, lol!

.
Thanks for the measurements, a good trick when measuring with a tape when you can't "hook" on the end is to measure off an inch or centimetre and subtract what ever point you decide to start with off the total.... :)
 
After playing with (pumping, lol) this thing all evening, I have figured that there's most probably an easy and cheap way to quiet down the "clacking" this gun makes every time you c*ck it. Because the hard hollow plastic foregrip literally slams into the front of the aluminum receiver every time you open the action, the whole contraption resonates like a small bell. Not very "tactical", lol.

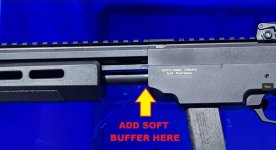
A possible solution would be to make a thin soft buffer, either out of synthetic foam (like stick-on window seal) or soft rubber. Think like a thick gasket or even a thick o-ring, essentially. This should quiet the action quite a bit.

Here's where the buffer would go. The back of the plastic foregrip actually has a large circular groove cut into it, so the buffer should not interfere with cycling as long as it's not too thick. About 2-3 mm in thickness should do the trick :

Buffer Project.jpg
 
Last edited:
I got my rifle in today too and I didn’t see any cross threading on the grip but the buffer tube was quite sloppy where it attaches to the back of the gun
That little set screw on the bottom doesn’t hold very well as there is not much meat on the tube for the threads
I ended up wrapping about 3 wraps of teflon tape around the external threads on the back of the reciever and then threaded the buffer tube on
This helped the slop quite a bit but that little set screw holding it on there is a piss poor design, they should have had more meat on the tube in that spot for it so it doesn’t strip out
It does have some sort of lock when you cycle it closed as you can hear it click into place when the bolt is in battery
It is a bit stiff to get to unlock so hopefully it gets better with use
I tried the included mags plus a 32 rounder I have and it cycled and ejected my hand loads ok, I never tried shooting any yet
It definitely need a vfg on the pump forend
 
Yeah, I'll pass on that for now. Not sure my neighbors would appreciate lol.

If I lived out on a farm, etc. the live primer test (without powder / bullet) would've been already done!

;)
I 'test' fire w/ primer only many times. Shoot into a stuffed trash bag, or a pillow, & it's not that loud at all. ;)
 
I can see some aftermarket fore ends rolling out if these guns run well.
Depending on how the plastic part mounts to the mechanism this may be something that 3D printing can solve.

A possible solution would be to make a thin soft buffer, either out of synthetic foam (like stick-on window seal) or soft rubber. Think like a thick gasket or even a thick o-ring, essentially. This should quiet the action quite a bit.
Again, 3D printing would make it easy to do a custom shaped bumper pad for there.


Mark

 
Depending on how the plastic part mounts to the mechanism this may be something that 3D printing can solve.


Again, 3D printing would make it easy to do a custom shaped bumper pad for there.


Mark

A 3D printed pic rail that is shaped to the contour of the factory pump should be pretty easy, the trick is using a filament that is strong enough or doing it with metal.
 
A 3D printed pic rail that is shaped to the contour of the factory pump should be pretty easy, the trick is using a filament that is strong enough or doing it with metal.
I was thinking of replacing the whole forearm with a new one that has an integral vertical grip or AFG. I think you'd be hard pressed to print a pic rail that would stand up to much.


Mark

 
I was thinking of replacing the whole forearm with a new one that has an integral vertical grip or AFG. I think you'd be hard pressed to print a pic rail that would stand up to much.


Mark

An aluminum rail segment bolted on as is and over hanging a few mill on each side of the flat on the bottom would be the easiest first attempt.
 
Had the exact same thing happen to me, taking mine to the range as I did the same as you. Even the cross threading, had a hunk almost identical. The box was also not well filled so I imagine the gun bouncing all over the place it the box didn't help

Just to let you know, I've taken my DYPA-12 Tactical apart yesterday and identified what the problem is : some confused assembly worker at the Derya factory had mismatched the bolts from the aluminum "stock / grip block" and the grip itself.

In essence, if you take the gun apart, you end up with 4 large hex bolts : two of them join the upper / lower receiver, one of them goes through the grip to secure it and the last one joins the aluminum "stock / grip block" to the rear of the receiver. Three of the bolts are of equal length, except for the fourth one which is maybe 1/4" LONGER. That longest bolt needs to be the one joining the "stock / grip block" to the receiver. I had to swap mine with the bolt they had used inside the grip.

After the bolt swap, everything went much better together. The longer bolt grabbed more threads inside the receiver and secured the stock / grip to the receiver much better. Problem solved!

.
 
I wanted to share this little "UPGRADE" I did to my DYPA-12 Tactical yesterday. While taking it apart, I noticed that the procedure is NOT as simple as the instructions would have you believe, as the "Tactical" version's stock / grip block completely hides the rear takedown screw located behind the trigger guard.

This means that you will need to take the stock, grip and aluminum block apart EVERY TIME you want to clean the gun. This is way too much PITA, but luckily there's a simple solution.

When looking at the lower receiver, I noticed that the rear hex bolt is sitting in a small channel which allows it a bit of "wiggle room". Essentially, with the aluminum block on top of it, the screw could become a "captive screw" if one were to drill out an access hole to it through the block. So I decided to do exactly that.

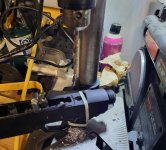
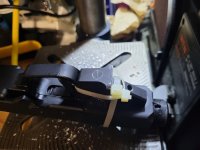
I took the gun apart the normal way and, once I had the aluminum stock / grip block and the lower receiver apart, I joined them together with some cable ties, so that they are in their assembled position. I could've just screwed them together, but was having trouble with the screw that was too short (see post above, issue was later corrected). Anyway, I used a 1/4" HSS drill bit and my stationary press drill in the garage to drill through the block. The lower receiver's screw hole is exactly 1/4", so I used it as a drill bit guide to drill through the aluminum block with machine shop-like precision. One could probably do the same with a hand drill, a good vice and a steady hand. The final result was very good. I later deburred the hole with a countersink and now it looks "factory".


1st picture -- 1/4" HSS drill bit in press drill, using the lower receiver screw hole as a drilling guide :

008.jpg


2nd picture -- Drilling completed. Perfect hole right in the center :

009.jpg


3rd & 4th pictures -- Closeup of the aluminum block :

010.jpg


011.jpg


5th picture -- Hole deburred with countersink and rifle reassembled. The new 1/4" access hole sits directly in-line over the hex screw's head, allowing access with a long Allen wrench :

012.jpg


20260607_135001.jpg


UPDATE : I took the rifle completely apart again and reassembled it. The access hole I drilled for the rear receiver screw is PERFECT. It allowed me to completely unscrew the rear screw and then to screw it back in with ease. As a bonus, the spacing between the screw head and the aluminum block is excellent, allowing the top of the captive screw's threads to reach just below the lower receiver line when the rifle is disassembled, thus not impeding the reassembly procedure at all. I was afraid that the rear receiver screw would protrude a bit, but it doesn't.

Derya, you need to start drilling these access holes in your future DYPA-12 Tactical rifles. It makes a world of difference come time to clean and/or maintain the rifle. It's confusing as to why your design department didn't figure this out from the get go.... it took me 2 minutes of looking at it to come up with the solution, lol.

:)
 
Last edited:
UPGRADE #2 : While I had the gun apart, I took some fine sand paper and sanded / polished all the rough edges on the bolt and inside the upper receiver where the bolt slides around, kind of like one would do to a brand new Ruger 10/22 with factory parts.

The parkerized coating Derya used on the outside is the same inside the upper receiver + the bolt and it has a lot of "traction" to it, meaning that it seems to act like a brake pad. Smoothing it out a bit with fine grit sand paper makes a nice difference.

I did not take pictures, but the procedure is extremely straight forward : Just round all the sharp edges and the top of the upper receiver and bolt a little bit to make them feel more "slippery". After cleaning, lubing with Ballistol and reassembly, the gun's pump feels a lot smoother, less gritty and easier to cycle. A bit quieter too.

I gotta say... this thing is growing on me, despite the few little "flaws" it came with, lol!

;)
 
Back
Top Bottom