You were wise to not force things. I think I might have tried a thinner wedge that went only half as far back, maybe significantly less. It is a cut and try kind of thing.
I should have asked how much cocking resistance there is now. I presume not much.
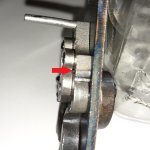
The discoloration of the sear nose is likely a result of heating to bend, but could also be a result of heat treating the nose. The question is at what point was all of this done and, as sean69 suggested, is this the original sear. I believe it is, but could be wrong. I do not believe straightening the sear nose would end well. For one thing, it would significantly lower the end of the sear bar. The consequences could be the sear spring no longer exerting pressure on the sear and the sear bar no longer clearing the trigger bars.
I would proceed as follows:
Remove the mainspring
Look at the sear nose and the face of the fly that the sear nose rides on. Are they smooth or rough? If the face if the fly is rough, stone it smooth being careful to maintain a flat surface. If the sear nose is rough or damaged, it should also be stoned, but that is a finicky job because the angles are critical.
Bring the hammer back to half ####. Does the sear securely engage the half #### notch and do things appear to line up properly. If yes and yes, all should be good there.
Bring the hammer back to full ####. Does the flat on the sear nose lie flat against the face of the full #### notch? If not, it and/or the full #### notch should be stoned which is another finicky job because angles are critical and incorrect angles can lead to unplanned discharge.
Put some forward pressure on the hammer and slowly raise the sear bar to release the hammer. Does the hammer move slightly forward or slightly back prior to the sear clearing the notch. Either condition indicates an incorrect sear/full #### angle and moving forward indicates a potentially unsafe condition. Moving back results in a heavier single trigger pull. This is a pretty crude method of checking angles.
Again, bring the hammer back to full #### and, while exerting forward pressure on the hammer, raise the sear bar just until the sear breaks clear. Move the hammer forward through the firing cycle while slightly lowering the sear bar and observe how the sear nose rides up and over the fly. Does it move smoothly, or does it grab or fetch up? If it grabs or fetches up, some adjustment of the fly is likely in order.
If the lock passes all those tests, I see no reason to modify or replace the sear, fly or tumbler.
An after-thought:
Please post pics of the back of the lock at half #### and at full ####. I would like to see the relative positions of the sear bar at rest, half #### and full ####.


")


