


Hi everyone,
First, I want to thank Jerry Teo for sharing the mods to the EM332A he’s been playing with in the “Most Accurate Inexpensive .22's? thread (https://www.canadiangunnutz.com/forum/showthread.php/1874702-Most-Accurate-Inexpensive-22-s/page12). Reading that thread inspired me to add one of these economical toys to my small collection of 22LRs. Rather than mixing EM332A mods with the discussion about the most accurate inexpensive .22s, I thought I’d start a fresh thread specific to mods for this rifle.
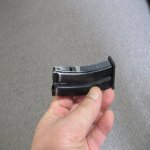
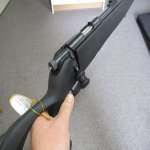
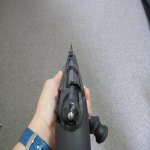
So far, I’ve removed the rear sight, deburred and polished the bolt and raceways, cleaned up and polished the innards of the bolt with 1000 grit wet & dry sandpaper cleaned up the sharp edges on the mags (basically what Jerry already described in the other thread – link above). I bore-scoped the muzzle today and found lots of burrs there as well, so I’ll polish that up with a brass castle nut and lapping compound in the next few days.
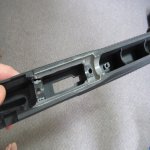
For today, I thought I’d share my trigger clean-up. Trigger pull out of the box was 3lbs 5oz and lots of creep. Removing the trigger, once the barrelled action is off the stock is easy and only requires a #2 phillips screwdriver to remove two screws. Taking the trigger apart is equally easy since there’s only one phillips screw holding the steel side-cover to the steel trigger housing. Make note of how the safety catch is oriented as the trigger is being removed – it’ll make life a lot easier when re-assembling.
There are only two moving parts: trigger and sear. A spring pushes up on the sear and forward on the trigger. First, I stoned and polished the trigger to reduce the amount of sear engagement to 0.022” (use a jig to hold the trigger at a constant angle and to keep it from rocking on the honing stone - don’t do this if you’re unsure of what to do or you want to use your rifle in the bush hunting; taking off too much or incorrectly will make the trigger dangerous and unusable). The sear just needed the end touching the trigger to be honed square to get full width engagement on the trigger notch. The trigger and sear were finished by polishing the surfaces that engage each other with white polishing compound and a felt wheel on a Dremel. The surfaces on the side of the trigger and the sear that rub on the trigger housing were polished, as were the areas of the trigger housing touching the sides of the trigger and sear.
All parts were cleaned with acetone and set aside. I also decided to make my own trigger-sear spring using 0.023” diameter piano wire. The detail of this is what I really want to share. Below are pictures of the process I used to make the spring. First picture shows the two blocks of oak I used to pinch the wire and a mandrel (this is just a cheap torx key that comes with many scope rings) so the wire could be wound. Make sure the vice jaws are tight so the wire doesn’t pull out.
 [/URL][/IMG]
Second picture shows how I gripped the piano wire with locking pliers. Third picture shows the beginning of the first coil on the spring.
 [/URL][/IMG]
 [/URL][/IMG]
Fourth picture shows the spring with two coils wound. This continued for four coils then going past the bottom leg by about 160 degrees. When tension is removed and the pliers are taken off, the spring will unwind about 270 degrees as shown in the fifth picture.
 [/URL][/IMG]
 [/URL][/IMG]
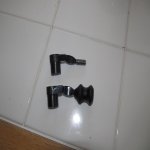
After removing the newly wound spring from the blocks of wood and vice, the legs can be bent to shape to match the original spring for angles and lengths. Picture six shows this using needle nose pliers. The last picture shows the original heavy spring next to the new lighter spring just made. This particular spring needed to be opened up about 20 degrees beyond a right angle between the legs, otherwise there won’t be enough tension on the sear to pass the bump test.
 [/URL][/IMG]
 [/URL][/IMG]
Before installing, anneal the spring at about 500 deg F. for 30 to 60 minutes (I use a convection toaster oven I bought for heating nasty stuff my wife doesn’t want in the kitchen – it’s really important she stays happy; that means I get to go to the range more).
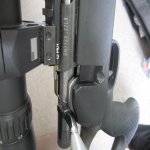
Install the new spring and polished trigger and sear in the housing. Re-assembly is simply the reverse of the steps to take the trigger assembly apart. I lubed assembled trigger with lighter fluid and re-installed on action.
Trigger now consistently breaks at 9oz and creep is almost completely gone. This trigger feels better and is lighter than one I have on a CZ455 which has been polished and has a Yo-Dave sleeve and spring kit installed. The EM332A trigger passes the bump test easily. Your mileage will likely vary. If rifle doesn’t pass bump test, either the trigger or sear surface engagement is wrong, or the spring is too light. Make sure rifle is safe before using.
Sorry for the long post. Hope this is helpful to at least a few of you. Enjoy! Joe.
First, I want to thank Jerry Teo for sharing the mods to the EM332A he’s been playing with in the “Most Accurate Inexpensive .22's? thread (https://www.canadiangunnutz.com/forum/showthread.php/1874702-Most-Accurate-Inexpensive-22-s/page12). Reading that thread inspired me to add one of these economical toys to my small collection of 22LRs. Rather than mixing EM332A mods with the discussion about the most accurate inexpensive .22s, I thought I’d start a fresh thread specific to mods for this rifle.
So far, I’ve removed the rear sight, deburred and polished the bolt and raceways, cleaned up and polished the innards of the bolt with 1000 grit wet & dry sandpaper cleaned up the sharp edges on the mags (basically what Jerry already described in the other thread – link above). I bore-scoped the muzzle today and found lots of burrs there as well, so I’ll polish that up with a brass castle nut and lapping compound in the next few days.
For today, I thought I’d share my trigger clean-up. Trigger pull out of the box was 3lbs 5oz and lots of creep. Removing the trigger, once the barrelled action is off the stock is easy and only requires a #2 phillips screwdriver to remove two screws. Taking the trigger apart is equally easy since there’s only one phillips screw holding the steel side-cover to the steel trigger housing. Make note of how the safety catch is oriented as the trigger is being removed – it’ll make life a lot easier when re-assembling.
There are only two moving parts: trigger and sear. A spring pushes up on the sear and forward on the trigger. First, I stoned and polished the trigger to reduce the amount of sear engagement to 0.022” (use a jig to hold the trigger at a constant angle and to keep it from rocking on the honing stone - don’t do this if you’re unsure of what to do or you want to use your rifle in the bush hunting; taking off too much or incorrectly will make the trigger dangerous and unusable). The sear just needed the end touching the trigger to be honed square to get full width engagement on the trigger notch. The trigger and sear were finished by polishing the surfaces that engage each other with white polishing compound and a felt wheel on a Dremel. The surfaces on the side of the trigger and the sear that rub on the trigger housing were polished, as were the areas of the trigger housing touching the sides of the trigger and sear.
All parts were cleaned with acetone and set aside. I also decided to make my own trigger-sear spring using 0.023” diameter piano wire. The detail of this is what I really want to share. Below are pictures of the process I used to make the spring. First picture shows the two blocks of oak I used to pinch the wire and a mandrel (this is just a cheap torx key that comes with many scope rings) so the wire could be wound. Make sure the vice jaws are tight so the wire doesn’t pull out.
Second picture shows how I gripped the piano wire with locking pliers. Third picture shows the beginning of the first coil on the spring.
Fourth picture shows the spring with two coils wound. This continued for four coils then going past the bottom leg by about 160 degrees. When tension is removed and the pliers are taken off, the spring will unwind about 270 degrees as shown in the fifth picture.
After removing the newly wound spring from the blocks of wood and vice, the legs can be bent to shape to match the original spring for angles and lengths. Picture six shows this using needle nose pliers. The last picture shows the original heavy spring next to the new lighter spring just made. This particular spring needed to be opened up about 20 degrees beyond a right angle between the legs, otherwise there won’t be enough tension on the sear to pass the bump test.
Before installing, anneal the spring at about 500 deg F. for 30 to 60 minutes (I use a convection toaster oven I bought for heating nasty stuff my wife doesn’t want in the kitchen – it’s really important she stays happy; that means I get to go to the range more).
Install the new spring and polished trigger and sear in the housing. Re-assembly is simply the reverse of the steps to take the trigger assembly apart. I lubed assembled trigger with lighter fluid and re-installed on action.
Trigger now consistently breaks at 9oz and creep is almost completely gone. This trigger feels better and is lighter than one I have on a CZ455 which has been polished and has a Yo-Dave sleeve and spring kit installed. The EM332A trigger passes the bump test easily. Your mileage will likely vary. If rifle doesn’t pass bump test, either the trigger or sear surface engagement is wrong, or the spring is too light. Make sure rifle is safe before using.
Sorry for the long post. Hope this is helpful to at least a few of you. Enjoy! Joe.
Last edited:


")


