If you want to dig into the statistics on this sort of thing, the answer is pretty straight forward. The more shots you're talking about, the more precise your answer is. A single 5-shot group leaves quite a margin of error. It shows that the answer you get from that has a 90% confidence interval of greater than +/- 40%, in other words, the true answer lies somewhere in that region of 40% below and 40% above the measurement you've taken. And you can't confidently pin it down any further than that.
So, if you have one 5-shot group that measures out to 1 MOA and another that measures out to 2 MOA, can you confidently say that one differs from the other? What is 40% of 1 MOA? 0.4 MOA, of course. And 40% of 2 MOA is 0.8 MOA. So for the 1 MOA group you have a 90% confidence interval of 0.6 to 1.4 MOA, and for the 2 MOA group this is 1.2 to 2.8 MOA. There is overlap there. The upper side of the 1 MOA group's confidence interval is greater than the lower side of the 2 MOA group's confidence interval. The presence of any overlap between the two means that you cannot say they are different with that 90% degree of confidence.
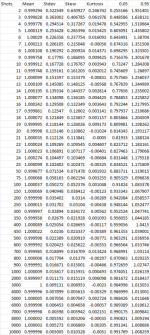
ok, so a single 5-shot group has too much leeway to be useful in this case because the possible overlapping region is so large. How do we know they have overlapping regions that large in the first place? Well, when dealing with things that seem to have some random element(s) to them it is common to use a Monte Carlo simulation with a lot of samples in order to come up with some statistically meaningful numbers. It is called a Monte Carlo simulation because you're just generating random samples, like the randomness of betting on certain games in a casino. Running a bivariate Monte Carlo simulation, which means one which contains an X value and a Y value like you'd need to describe the POI on a target, and doing it millions and millions of times will result in a table such as this:
View attachment 1055818
Most everyone is familar with mean (average) and Stdev. Skew and kurtosis are just things that describe the shape of the samples, but we don't care much about that for this. And I've deleted all but the 0.05 and 0.95 quantile/percentile columns for brevity, since those are the two we care about to show a 90% confidence interval anyway. For 5 shots we see here the 0.05 column contains the value of 0.603091, which is our confidence interval's lower bound, and the 0.95 column contains the value of 1.435802, which is our confidence interval's upper bound. This is where I get the "greater than +/- 40%" from, as this indicates about 39.7% below or about 43.6% above is our confidence interval. If we scroll down to 25 shots we can see that this has reduced the lower bound to 0.834521, and the upper bound to 1.171609, so we're now down to roughly +/- 17%. So let's look back at our 1 MOA vs. 2 MOA group size comparison again.
1 MOA +/- 17% means 0.83 MOA to 1.17 MOA
2 MOA +/- 17% means 1.66 MOA to 2.34 MOA
25 shots has tightened up our confidence interval enough that we can now say they are different as it now passes our 90% confidence test. There is no longer any overlap between the two, so, we are confident that they are different. In this case, comparing a 1 MOA group to a 2 MOA group, 5 shots was not enough to give us a good answer, but 25 shots was enough to do so. And that's because 25 shots was enough to eliminate overlap between the two measurements from a statistical point of view. This does not mean that 25 shots is always enough. What it tells us is that how many shots we need to take in order to determine if there is a difference or not depends on how fine our measurements are. 5 shots were not enough to compare 1 MOA vs. 2 MOA, but 25 shots were. If you step through the figures here you can see that for that comparison you'd actually only need to step up to 8 shots to eliminate the overlap. But for comparisons with groups that are much closer in size you will find that you need to continue moving further down the list in order to eliminate the overlap. 50 shots is roughly +/- 12%, 75 shots brings that under the +/- 10% mark, 100 shots is roughly +/- 8%, etc.
So, this means that for this kind of testing you may end up having to take more shots if you find that however many shots you've already taken end up having answers that overlap. It can also mean that it might take an unreasonable amount of shots in order to eliminate that overlap. Which is another way of saying that the overlap should probably be considered real, and that your actual answer is that the two things you're comparing are too close to each other to say they are different. So, sometimes you have to break down and finally draw the line. Maybe you can get a reasonable answer in a reasonable number of shots, and maybe you can't. It depends on how much difference there actually is between the two things you're comparing. If the two things are very similar it might take an obscene amount of shots before you finally gain enough confidence to declare there does indeed appear to be a real difference.
edit: And as Williwaw pointed out while I was typing all of this, measuring the extreme spread of a group is not a particularly useful way to compare groups. You're ignoring the general performance seen in the entire group when you only consider the two shots that are furthest from each other. I like to use the mean radius. And if things are fairly close with the mean radius comparison then I will also look at the SD radius. The circular error probable is a metric that's similar to mean radius, only it includes a slightly different percentage of the shots. The military likes to use CEP, which indicates the size of a circle that would contain 50% of the shots. Mean radius is similar, but it describes the radius of a circle that would contain about 54% of the shots. They're more accurate ways of describing the general performance you should see if you keep shooting than the extreme spread of a group. The extreme spread of a group doesn't really tell you much of anything about the general performance you'll see if you keep shooting. All that tells you is what your two worst shots were. If you have a super tight 0.2 MOA group with a single 2 MOA flier that is going to have a much smaller mean radius than a group that just looks like a 2 MOA shotgun spread where all the shots are spread very randomly and evenly. That's why the mean radius is a more useful metric. It would tell you to pick the one with the very tight group and flier, while extreme spread would consider both the same with no reason to choose one over the other. It allows you to make a useful prediction about future performance. Extreme spread doesn't really give you that kind of info.


